Mastering Policies in Defender for Cloud Apps: A Deep Dive for the SOC Trenches
Alright, class. Take your seats. Today is a long lesson, but given the subject, it's well worth it. Grab your coffee (and maybe another one down the line)
Last time, we talked about getting visibility into your cloud with Defender for Cloud Apps (MDCA). You flipped the switch, integrated with MDE, discovered your Shadow IT nightmare, and started tagging apps as sanctioned or unsanctioned. You built the lookout tower. You can finally see what's happening.
But...visibility without control is just voyeurism. You're watching the chaos unfold, but you're not doing anything about it. Today, we're going from passive observer to active enforcer. We're talking about policies, the beating heart of Defender for Cloud Apps. Policies are how you move from "Oh no, someone just uploaded our entire customer database to a sketchy file-sharing site" to "That upload was automatically blocked, the file was quarantined, the user's account was suspended, and the CISO got an alert, all before you finished your coffee."
This is where MDCA earns its keep. Buckle up.
The "What": Understanding Policies in Defender for Cloud Apps
Let's start with the fundamentals. A policy in Defender for Cloud Apps is a rule that defines what behaviour you're looking for and what happens when you find it. Think of it as an "if this, then that" statement on steroids.
At its core, a policy has three components:
Conditions: What are we watching for? This could be "a user downloading more than 50 files in one minute," "a file containing credit card numbers being shared publicly," or "an admin logging in from a suspicious IP address."
Scope: Who and what does this apply to? Specific users? All users? Certain apps? Certain file types?
Actions: What happens when the conditions are met? Do we send an alert? Block the activity? Quarantine a file? Suspend a user?
Policies are your automation layer. They're how you scale your SOC team from three overworked analysts to a tireless, 24/7 detection and response machine. Without policies, you're manually hunting through logs. With policies, MDCA hunts for you and takes action automatically.
Why Policies Matter (Or: Why Your Current Security Posture is Probably a Dumpster Fire)
Let me paint a picture. Your organisation has 2,000 employees. They use Office 365, Salesforce, Slack, Dropbox, Box, Google Drive, and about 47 other SaaS apps you don't even know about yet. Every single one of those employees can, at any moment:
- Download your entire client list and email it to a personal Gmail account.
- Share a confidential PowerPoint with a public link.
- Upload malware-infected files to SharePoint.
- Log in from a botnet IP in Russia.
- Grant OAuth permissions to a sketchy third-party app that hoovers up all their email.
You cannot manually watch 2,000 people across 50+ apps, 24 hours a day. It's impossible. That's why policies exist. They are your force multipliers. They detect threats, enforce compliance, protect data, and stop breaches while you're asleep, in meetings, or arguing with the CEO about your department's budget.
For a SOC analyst, policies are the difference between drowning in alerts and having actionable, prioritised incidents land directly in your queue, complete with context, severity, and recommended actions. They're also the difference between "we detected the breach three months after it happened" and "we stopped it in real-time."
Policy Types: Your Arsenal
Defender for Cloud Apps offers several types of policies, each designed for a different use case. Let's walk through them (well, most of them - we are going to stay quiet about some of the OAuth for now and talk about them in a future post)
Activity Policies
Activity policies monitor user and admin actions across your connected cloud apps. These are your bread-and-butter threat detection policies.
What they detect: Specific activities like failed login attempts, mass downloads, administrative actions from non-corporate IPs, or unusual user behaviour.
Example use cases:
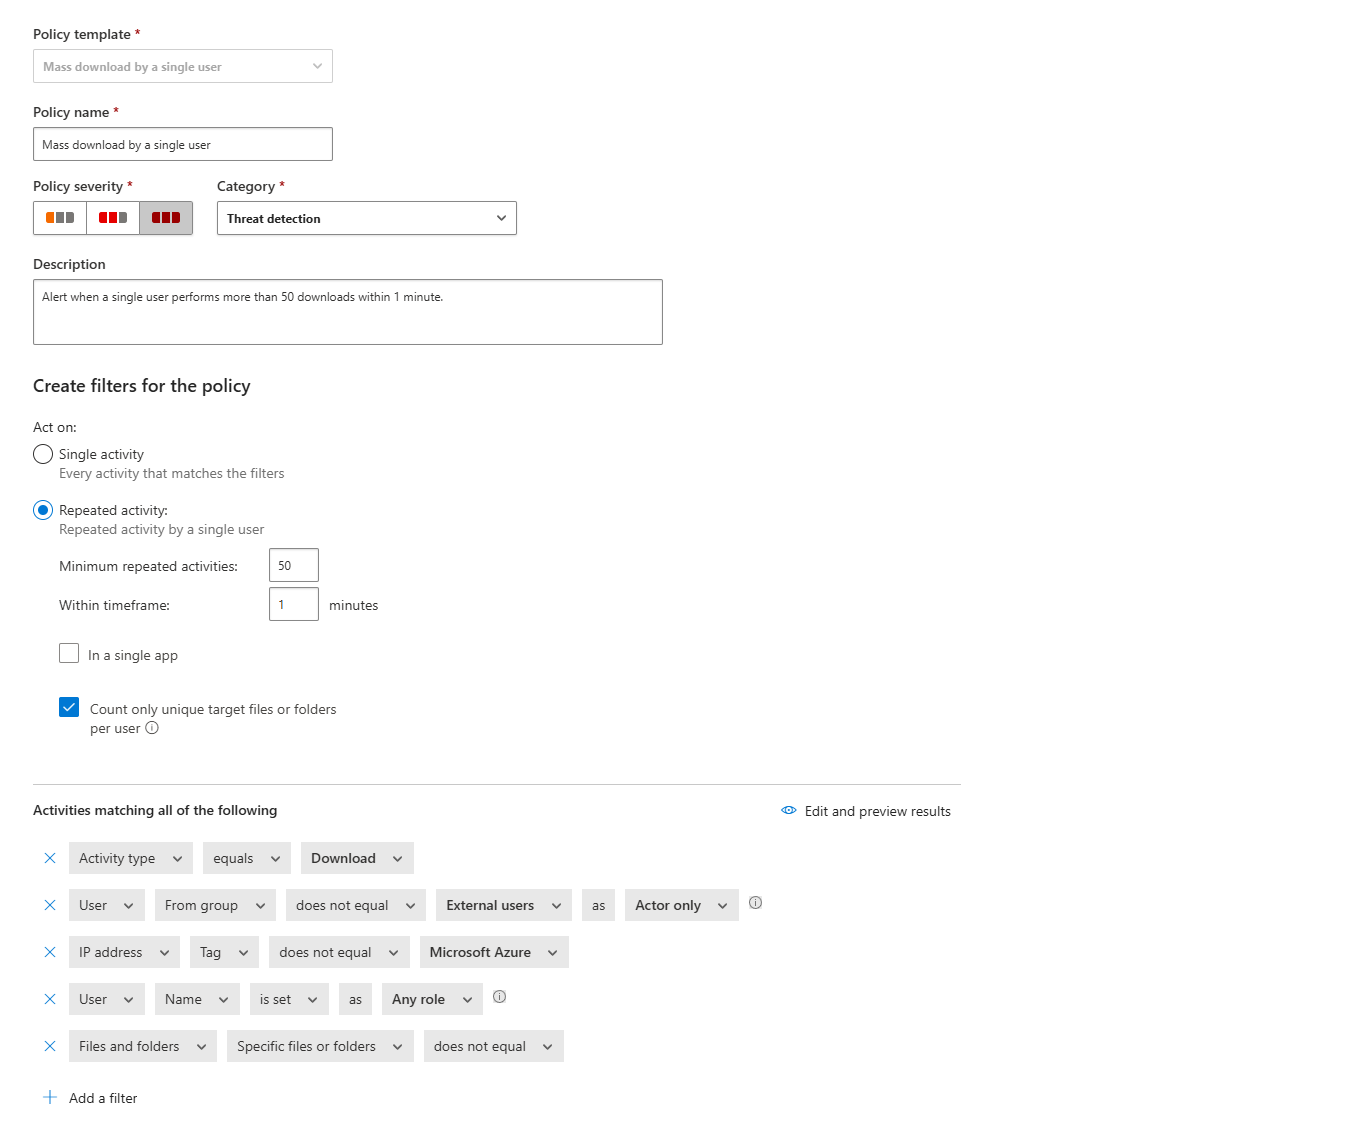
- Alert when a single user downloads more than 50 files in one minute (data exfiltration).
- Alert when a user fails to log in more than 10 times in 5 minutes (credential stuffing).
- Alert when an admin creates a new API token (potential for abuse).
- Alert when a user logs in from a risky IP address (anonymous proxy, TOR, botnet).
How they work: Activity policies use the app provider's APIs to monitor every action taken in your sanctioned apps. When the conditions are met, MDCA can send an alert, notify the user, or even suspend the user's account.
It's like having a Logic Application that pulls that information from the API to a Sentinel's table and then runs the NRT Analytic Rule, amazing, right?
Anomaly Detection Policies
These are your machine learning powered, behaviour-based detection policies. Anomaly detection policies learn what "normal" looks like for your organisation and individual users, then alert you when something deviates from that baseline.
What they detect:
- Impossible travel (user logs in from London, then New York 30 minutes later).
- Mass downloads or deletions that are unusual for a specific user.
- Activity from infrequent countries.
- Suspicious inbox forwarding rules
- Ransomware activity (rapid file encryption patterns).
How they work: MDCA has an initial seven-day learning period during which it builds a baseline of normal activity. After that, it continuously compares new activity against the baseline and scores it for risk. If the risk score is high enough, you get an alert.
Critical note: These policies are mostly pre-built and cannot be created from scratch, but you can scope them. For example, you can exclude frequent travellers from the "impossible travel" policy to reduce false positives.

File Policies
File policies scan files stored in your connected cloud apps (OneDrive, SharePoint, Box, Google Drive, Dropbox) and take action based on file content, metadata, or sharing permissions.
What they detect:
- Files containing sensitive data (credit card numbers, social security numbers, PII) that are shared publicly.
- Files with specific extensions (like .exe or .crt) that are exposed.
- Files shared externally that haven't been modified in 90+ days (stale external shares).
- Malware-infected files.
Actions they can take:
- Quarantine the file (user quarantine or admin quarantine).
- Remove external sharing permissions.
- Apply a sensitivity label.
- Notify the file owner or admin.
- Trash the file.
Profo's Wisdom: File policies are powerful but can be performance-intensive. When you create your first file policy, MDCA starts scanning files. If no file policy exists or is disabled for seven consecutive days, file monitoring is auto-disabled. So always have at least one file policy active, even if it's just a low-risk monitoring policy.

Access Policies
Access policies provide real-time control over who can access your cloud apps based on user, device, location, and more.
What they do:
- Block access from unmanaged devices.
- Block access from risky locations.
- Require device compliance before granting access.
- Require MFA for specific apps.
How they work: Access policies integrate with Conditional Access App Control. When a user tries to access an app, the session is routed through MDCA, which evaluates the policy and either allows, blocks, or challenges the user (to a duel 😼)
Session Policies
Session policies are like access policies but more granular. Instead of blocking access entirely, they allow access but monitor and control what the user can do during the session.
What they control:
- Block downloads of sensitive files.
- Block copy/paste actions.
- Block printing.
- Require sensitivity labels on uploads.
- Block sending Teams messages with specific content (like passwords or credentials).
How they work: Like access policies, session policies rely on Conditional Access App Control. The user's session is proxied through MDCA, and every action is inspected in real-time. If the user tries to do something forbidden (like download a file with a "Confidential" label), MDCA blocks it and shows a custom message.
Profo's Wisdom: When session policies are active, users will see a notification that their activity is being monitored, and the URL will change to include .mcas.ms (unless you're using Microsoft Edge for Business with in-browser protection).
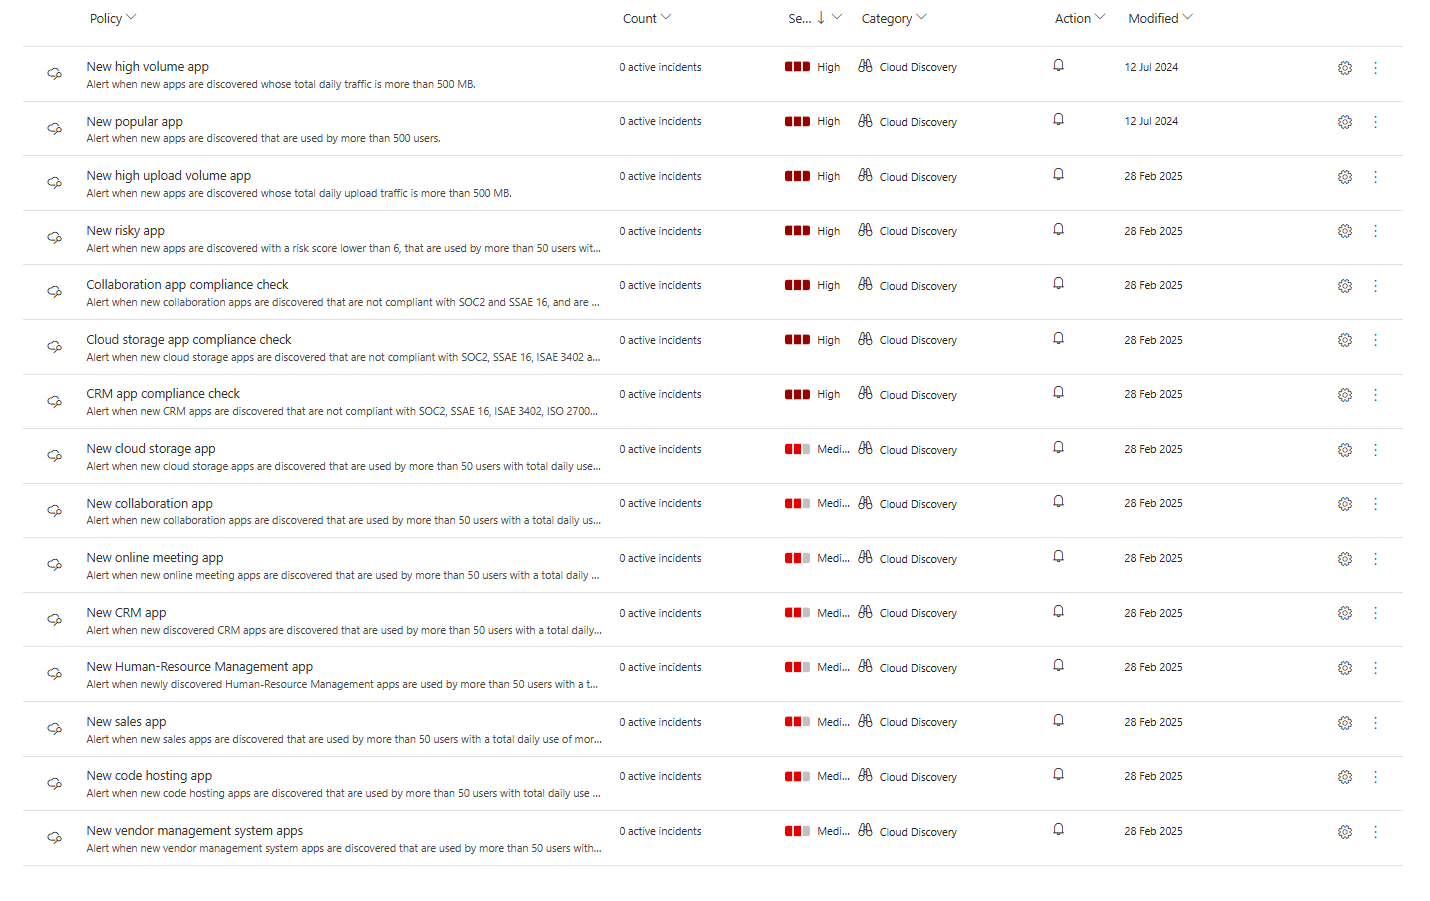
App Discovery Policies
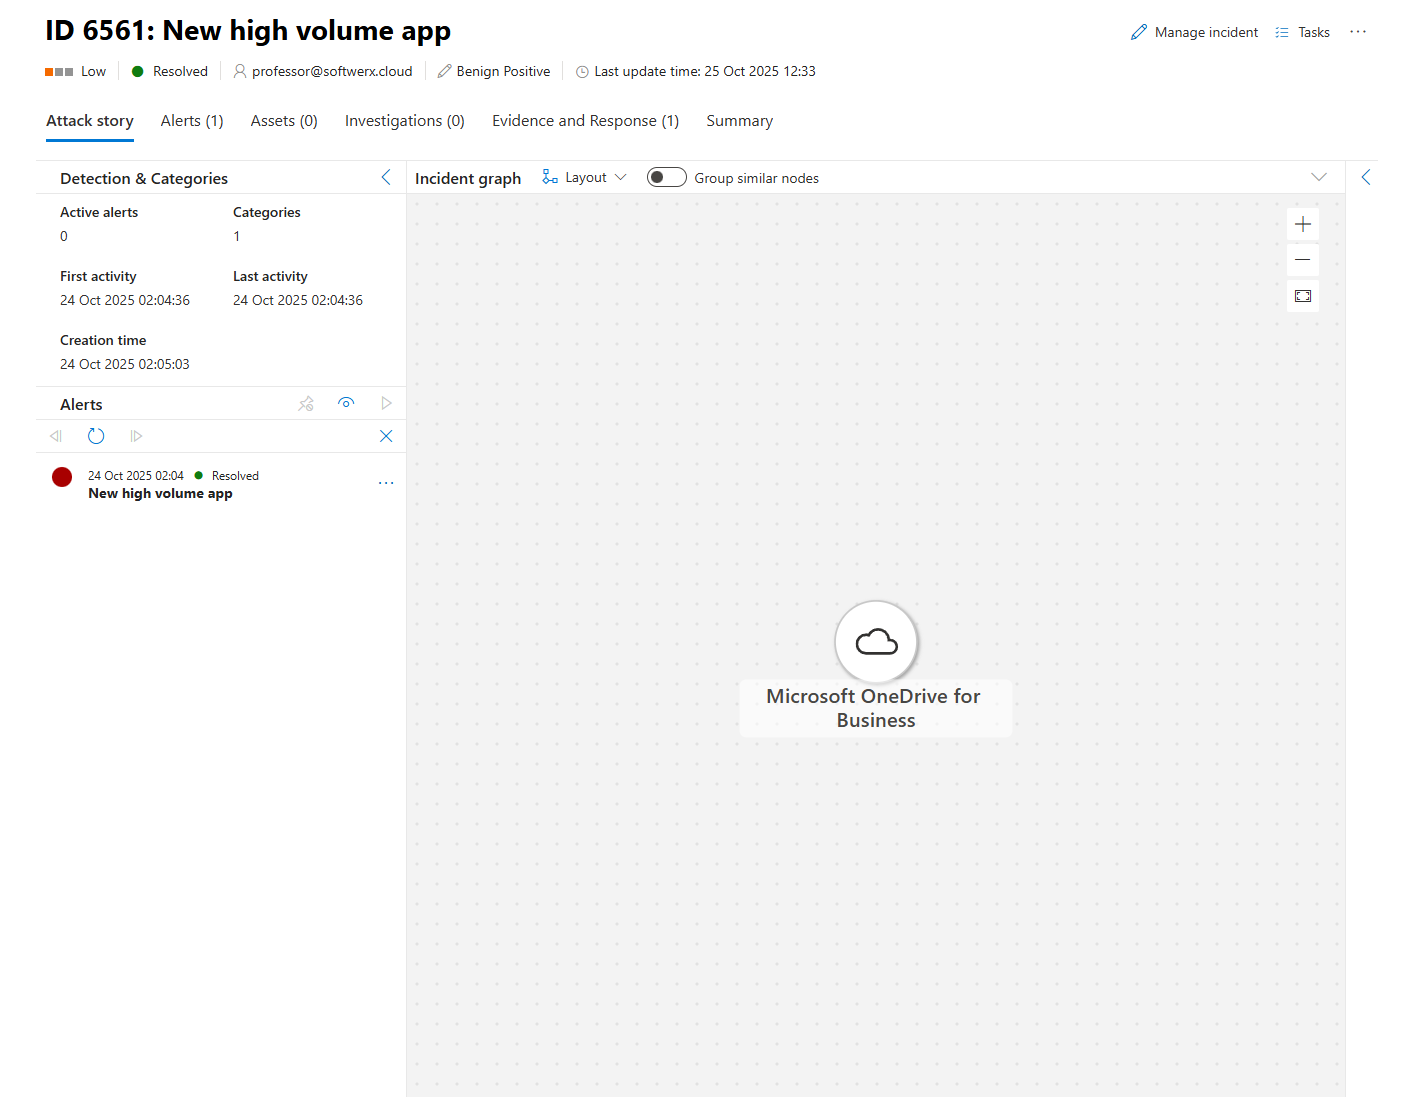
App discovery policies alert you when new apps are detected in your environment.
What they detect:
- New high-volume apps (apps with more than 500 MB of daily traffic).
- New risky apps (apps with a risk score below 6).
- New apps in specific categories (CRM, collaboration, cloud storage) that are being used by more than 50 users.
Why this matters: Shadow IT doesn't stay static. New apps pop up all the time. App discovery policies ensure you're notified immediately when a new, potentially risky app gains traction in your organisation.
Tuning and Scoping Anomaly Detection Policies: Making Them Work for Your Environment
A little secret about anomaly detection policies: out of the box, they're going to scream at you. A lot. You'll get alerts for the CFO who travels internationally every week. You'll get alerts for the DevOps team who legitimately download hundreds of files daily. You'll get alerts for employees who work remotely from different countries. And if you don't tune these policies, your SOC team will drown in false positives and start ignoring MDCA alerts entirely.
Let's fix it.
The Sensitivity Slider: Your False Positive Control
The Impossible Travel policy has a unique feature: a sensitivity slider that directly controls how strict the detection logic is. This slider determines what level of suppression is applied before an alert is triggered.
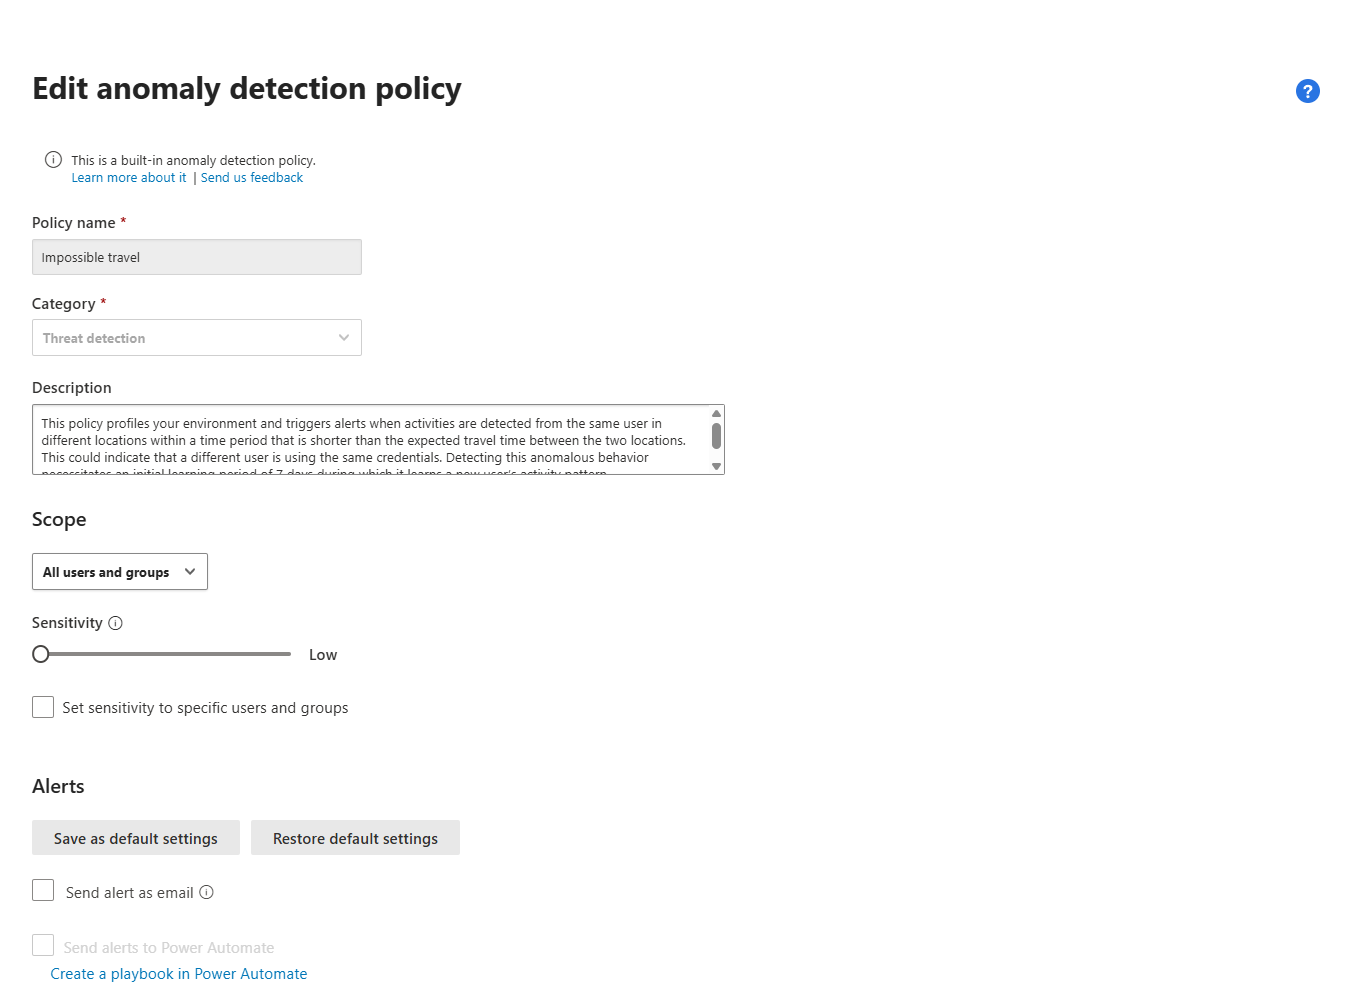
Here's how it works:
Low sensitivity: Applies system suppressions, tenant suppressions, and user suppressions. This means the policy will ignore common travel patterns across your entire organisation and individual users. Set it to Low if you have a highly mobile workforce (consultants, sales teams, executives who travel constantly). You'll get fewer alerts, but you'll only see the really unusual travel patterns.
Medium sensitivity: Applies system suppressions and user suppressions, but not tenant suppressions. This means the policy will still alert on locations that are common across your organisation if they're unusual for a specific user. This is the sweet spot for most organisations.
High sensitivity: Applies only to system suppressions (built-in detections that are always suppressed, like known VPN exit nodes). Everything else triggers an alert. Set this if you have a highly static workforce or if you're actively hunting for compromised accounts. Be prepared for a high volume of alerts.
Key detail: When IP addresses on both sides of the travel are tagged as corporate (safe), and the sensitivity slider is not set to High, the travel is trusted and excluded from triggering the detection. However, if only one side of the travel is considered safe, the detection triggers as normal.
Profo's Wisdom: Don't just set the sensitivity slider once and forget about it. Review your Impossible Travel alerts monthly. If you're getting too many false positives, dial it down. If you're not getting enough signal, dial it up. This is an iterative process.
Scoping Policies: Include and Exclude Like a Pro(fo)
Every anomaly detection policy can be scoped to apply only to specific users or groups. This is how you exclude frequent travellers, service accounts, or test users from policies that would otherwise generate constant noise.
To scope a policy:
- Go to Cloud Apps > Policies > Policy management and select Anomaly detection policy as the policy type.
- Select the policy you want to scope (e.g., "Activity from infrequent country").
- Under Scope, change the dropdown from All users and groups to Specific users and groups.
- Use Include to specify which users or groups this policy applies to. Anyone not selected here won't generate alerts.
- Use Exclude to specify users or groups to ignore, even if they're members of an included group.
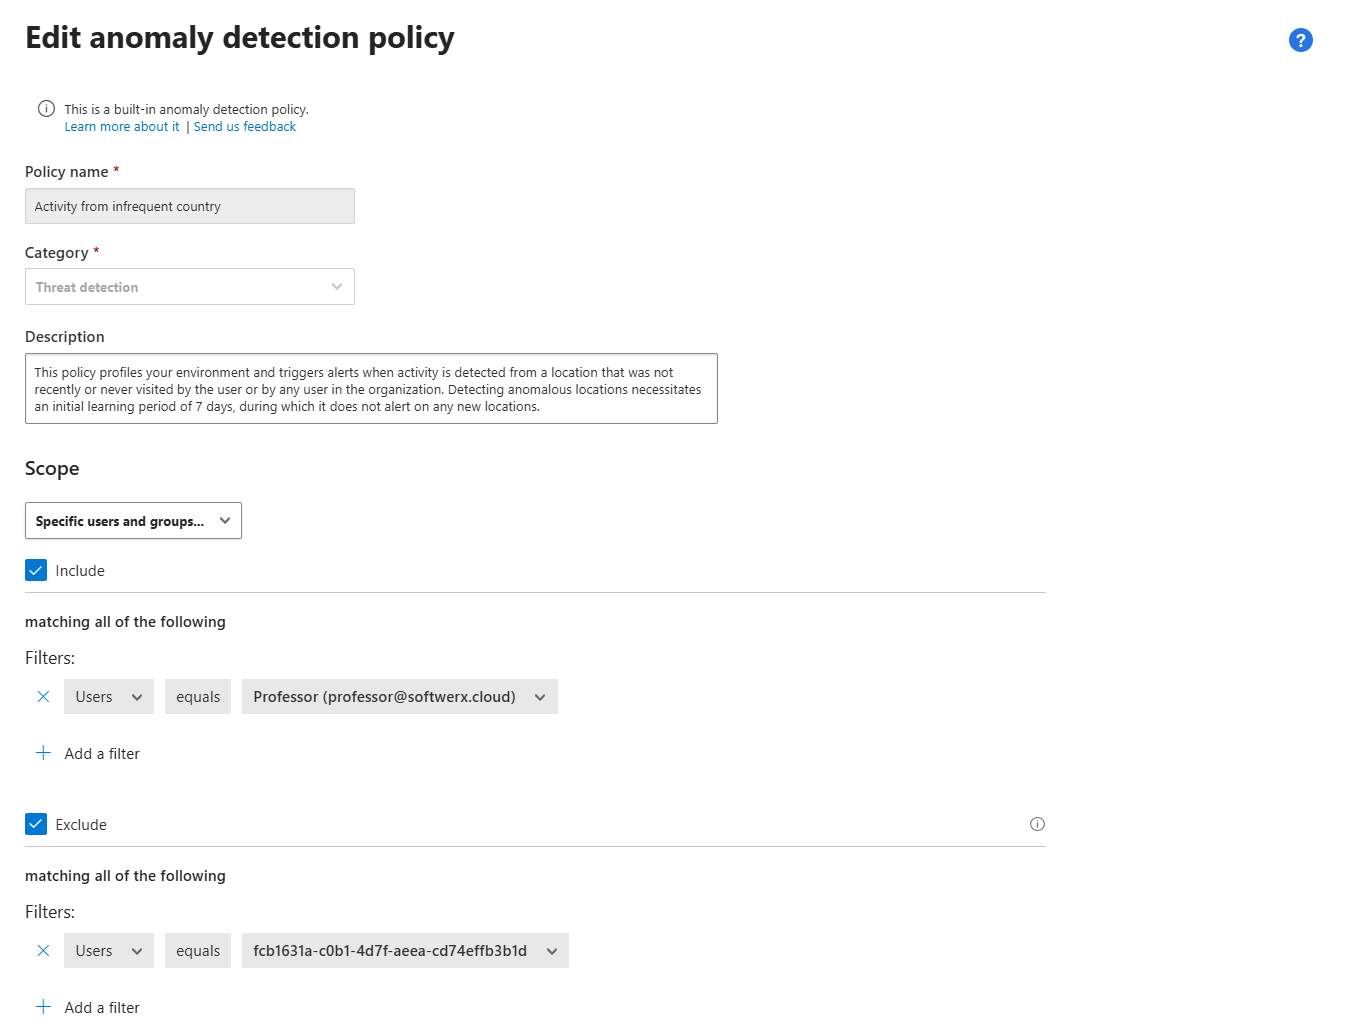
Example use case: Your VP of Sales travels to 15 countries a month. She's generating "Activity from infrequent country" alerts constantly. Solution? Exclude her from the policy. She's still covered by other policies (like activity from suspicious IP addresses or ransomware detection), but you've removed a constant source of noise.
Another example: You have a group of DevOps engineers who routinely perform mass downloads from GitHub and internal repos. They're triggering "Unusual multiple file download activities" alerts daily. Exclude them from that specific anomaly policy or add a filter in the policy for does not equal (to a specific folder), but keep them in scope for other policies like "Activity from suspicious IP addresses."
Scoping is not cheating. It's tuning your detection engine to focus on actual anomalies, not predictable business activity.
Understanding Risk Indicators: The 30+ Factors Behind the Alerts
Anomaly detection policies don't just randomly decide something is suspicious. They evaluate over 30 different risk indicators, grouped into the following risk factors:
- Risky IP address (known botnets, TOR nodes, anonymous proxies, malicious IPs from Microsoft Threat Intelligence)
- Login failures (multiple failed login attempts indicating credential stuffing or brute force)
- Admin activity (unusual administrative actions, especially from non-corporate IPs)
- Inactive accounts (accounts that haven't been used in months suddenly become active)
- Location (activity from unusual geographic locations)
- Impossible travel (physically impossible travel between two locations in a short time)
- Device and user agent (new or unusual devices, suspicious user agents)
- Activity rate (mass downloads, mass deletions, rapid file uploads)
Each session is compared against a baseline that was learned over the past month of activity. The system looks at when users were active, which IP addresses they used, which devices they connected from, and what their normal activity patterns look like. When something deviates significantly from that baseline, the risk score increases, and if it crosses the threshold, you get an alert.
This is why the initial seven-day learning period is critical. During those first seven days, MDCA is building the baseline. You won't get the full range of anomaly alerts during this period because the system is still learning what "normal" looks like for your environment.
It's also one of the reasons more experienced SOC services will tell you that they need to wait for a few weeks before coming up with any reports - this is so they can establish a good baseline.
Key takeaway: Be patient. Don't judge MDCA's anomaly detection capabilities in the first week. Give it a month to learn your environment, then start tuning.
Triaging Anomaly Detection Alerts: Using the Activity Drawer
When an anomaly detection alert fires, you need context fast. Is this a real threat, or is it just Bob from Finance working late again?
MDCA gives you an Activity drawer that provides instant context.
To triage an alert:
- Go to Cloud Apps > Activity log.
- Click on the activity that triggered the alert.
- The Activity drawer opens on the right. This shows you the full details of the activity: user, IP address, device, app, action taken, and risk score.
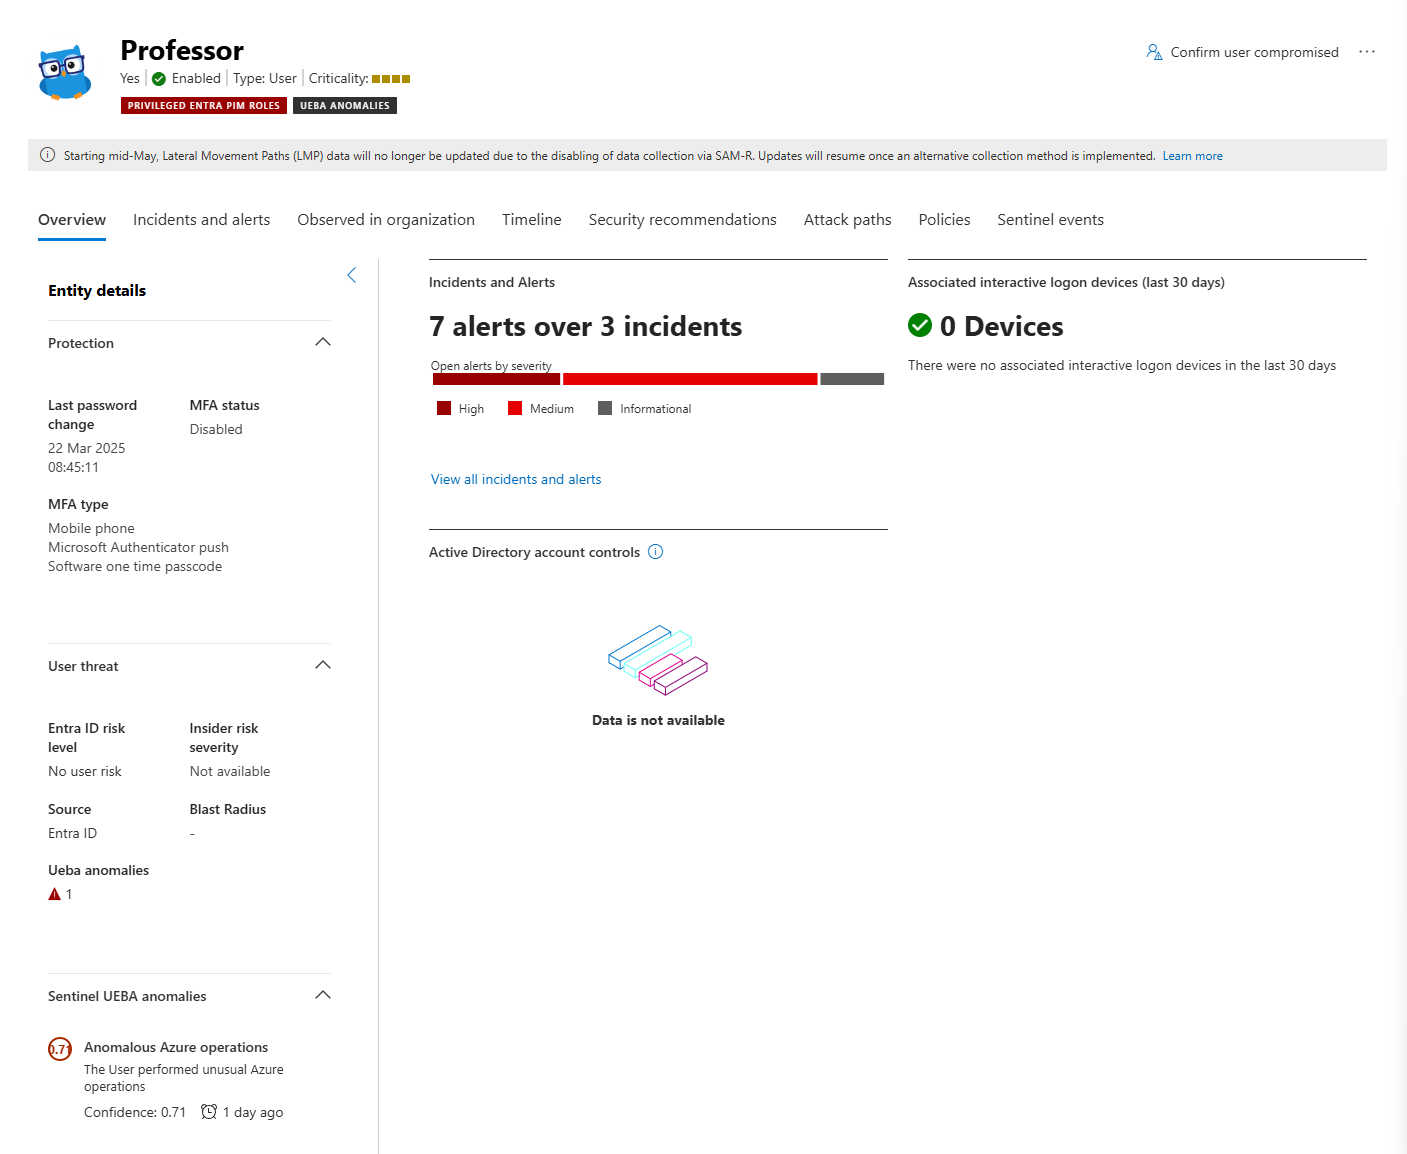
- Click the User tab in the drawer to see User insights. This tab is gold. It shows you:
- Number of alerts associated with this user
- Recent activities
- Locations they've connected from
- Devices they've used
- Risk score trends

This context allows you to make a fast decision: "This user has 15 alerts in the last 24 hours, all from different countries, and they're downloading massive amounts of data. Compromised account. Suspend immediately." Or: "This user has one alert, it's from their home IP, and they've been working from that location for the past six months. False positive. Dismiss."
The Activity drawer is how you move from "alert fatigue" to "rapid triage and response."
File Sandboxing: Proactive Malware Detection in Third-Party Apps
Here's something many admins don't realise: MDCA can proactively sandbox files in third-party apps like Box, Dropbox, and Google Workspace.
When file sandboxing is enabled, files that are flagged as potentially risky based on metadata and proprietary heuristics are sent to a safe sandbox environment for detonation and analysis. If the sandbox detects malicious behaviour, the file is flagged as malware.
In OneDrive and SharePoint, files are automatically scanned and sandboxed as part of the service itself. You don't need to configure anything. But in Box, Dropbox, and Google Workspace, MDCA handles the sandboxing.
Limitation: MDCA doesn't automatically block malware files in third-party apps. Blocking depends on the app's capabilities and your configuration. However, once a file is detected as malware, you can manually quarantine it, remove sharing permissions, or trash it using governance actions.
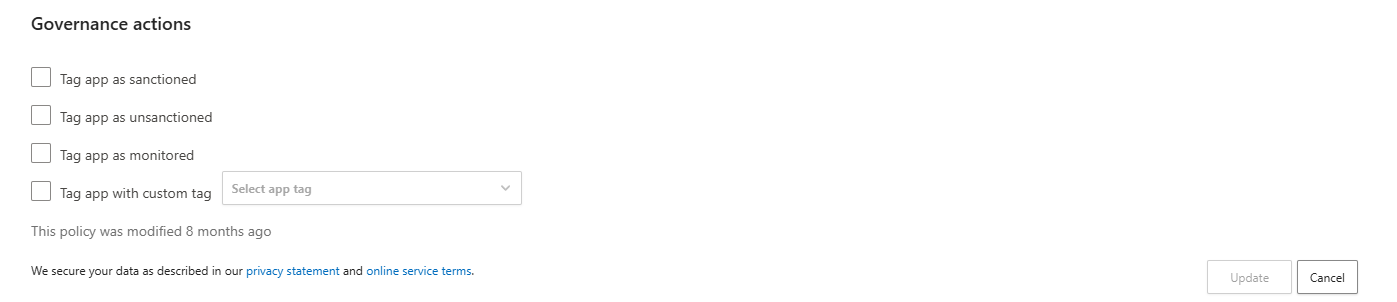
Automated Governance on Anomaly Detection Policies
You can configure automated remediation actions that trigger automatically when an anomaly detection policy fires.
To enable automated governance:
- Go to Policies > Policy management and select the anomaly detection policy you want.
- In the Edit anomaly detection policy window, scroll down to Governance actions.
- Set the actions you want for each connected app (or for all apps). Options include:
- Suspend user
- Require user to sign in again
- Notify user/user
- Confirm user compromised
- Click Update.

Warning: Be very careful with automated suspension. If you auto-suspend users on every "Activity from infrequent country" alert, you're going to suspend your travelling executives and create a political nightmare. Instead, start with notifications and require reauthentication, then escalate to suspension only for high-severity policies like ransomware activity or activity from suspicious IPs.
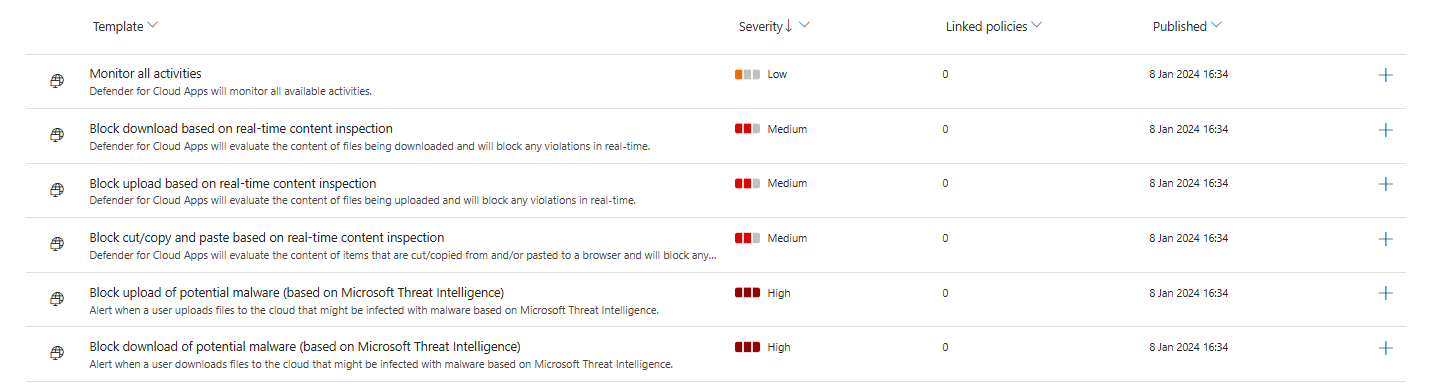
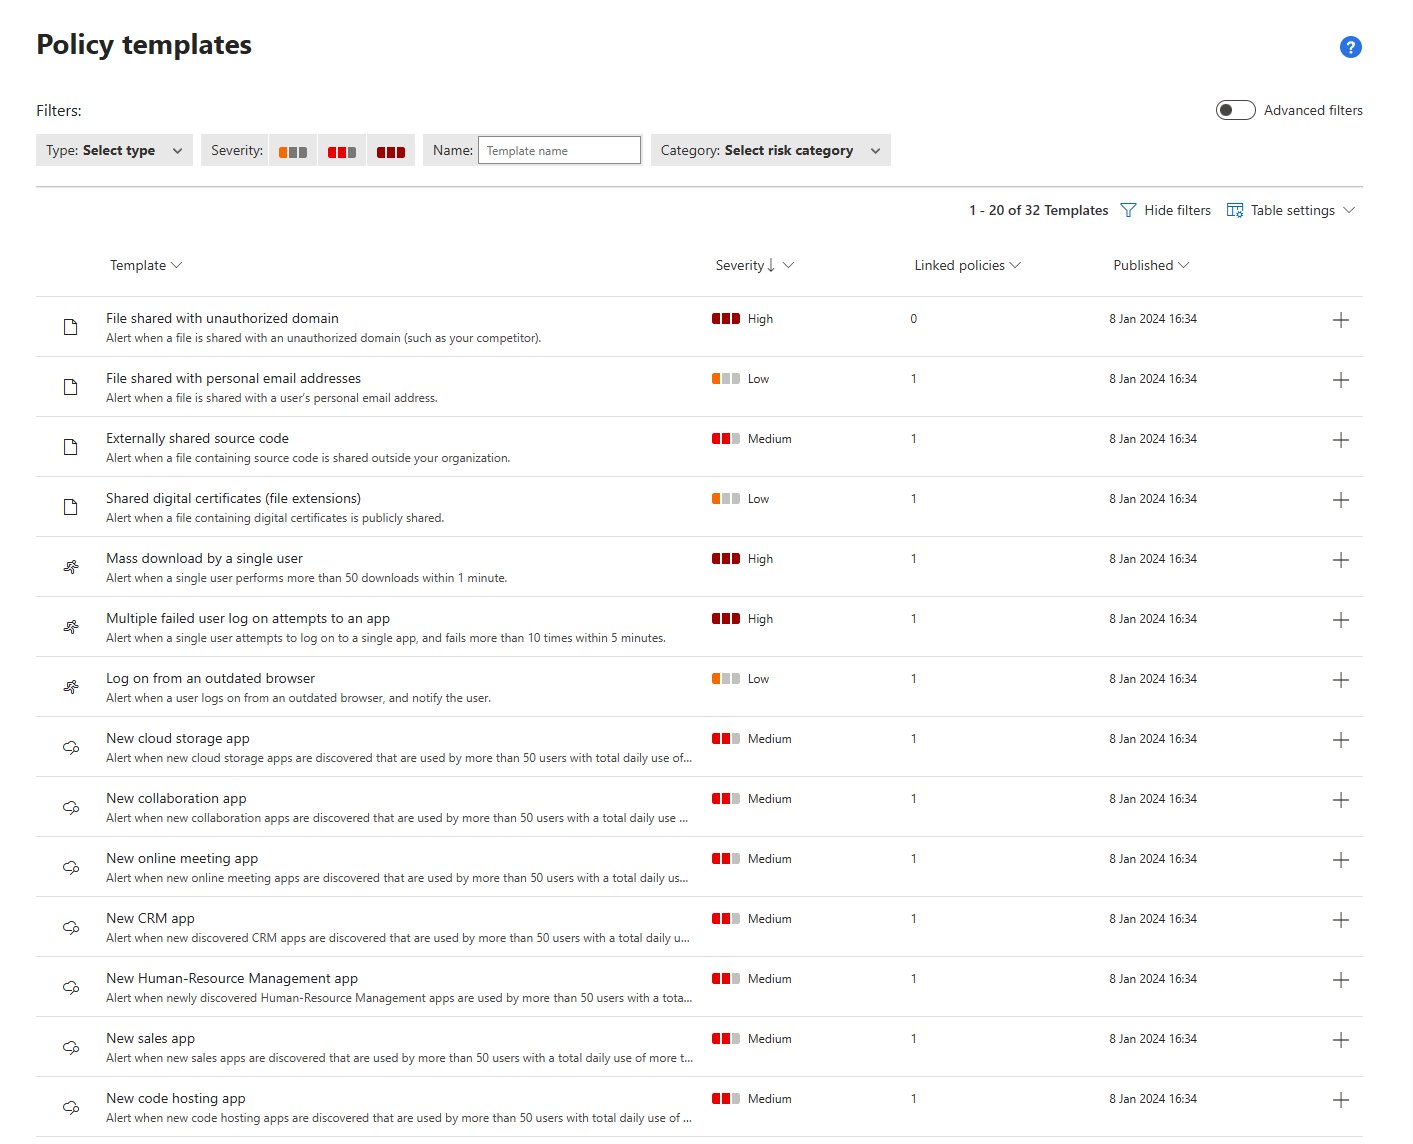
Policy Templates: Your Starting Point
Microsoft provides dozens of policy templates to make your life easier. These are pre-configured policies that cover the most common use cases. Instead of building a policy from scratch, you can select a template, tweak a few settings, and deploy it in minutes.
Here are some of the most useful templates:
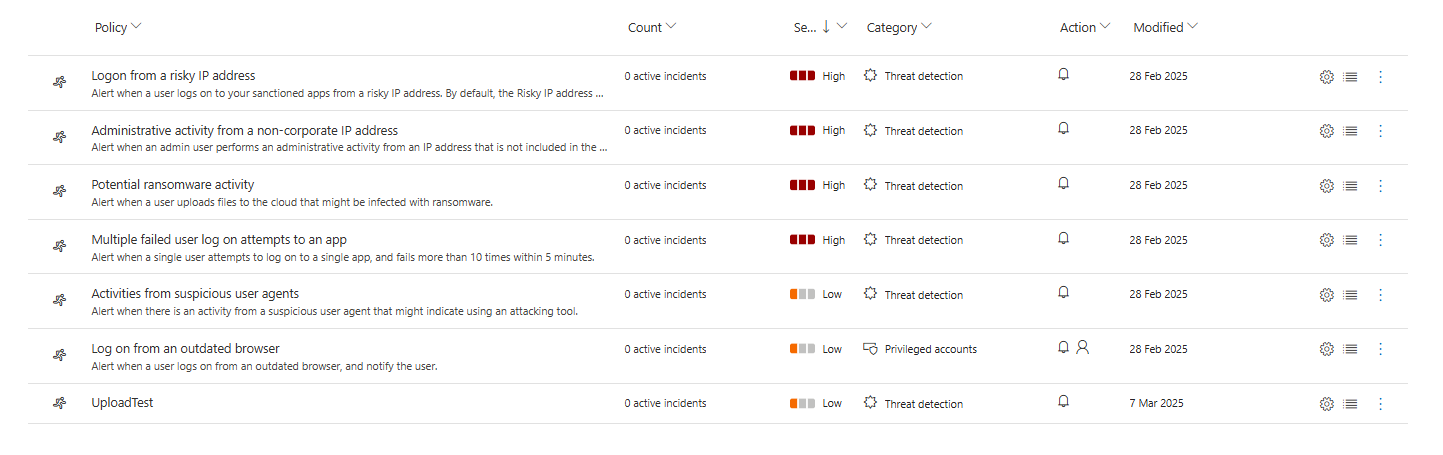
Threat Detection:
- Mass download by a single user
- Multiple failed user sign-in attempts to an app
- Logon from a risky IP address
- Administrative activity from a non-corporate IP address
- Potential ransomware activity
Data Loss Prevention (DLP):
- Externally shared source code
- File shared with personal email addresses
Cloud Discovery:
- New risky app
- New high volume app
- New popular app
- Cloud storage app compliance check
Sharing Control:
- File shared with unauthorized domain
- Publicly accessible S3 buckets (AWS)
- Shared digital certificates
To use a template, navigate to Cloud Apps > Policies > Policy templates in the Microsoft Defender portal. Browse the list, select the template you want, click the + button, and a pre-configured policy creation page opens. Modify it as needed, then hit Create.
Every policy created from a template is linked back to the original template, so you can track which policies came from which templates. This is useful for auditing and governance.
Creating Custom Policies: The Hands-On Guide
Sometimes a template doesn't quite fit your needs. That's when you create a custom policy. Let's walk through the process using a File Policy as an example.
Step 1: Navigate to Policy Management
In the Microsoft Defender portal, go to Cloud Apps > Policies > Policy management.
Step 2: Create a New Policy
Click Create policy and select File policy.

Step 3: Name and Describe Your Policy
Give it a clear, descriptive name. For example: "Block Publicly Shared Files Containing Credit Card Numbers." Add a description explaining the purpose and any context future admins will need.
Step 4: Set Policy Severity
Choose a severity level (Low, Medium, High, Critical). This determines how the policy is prioritised and whether alerts are sent based on severity thresholds you've configured.
Step 5: Select a Category
Choose the risk type this policy addresses (DLP, Threat Detection, Compliance, etc.). This is mostly for organisation and filtering later.

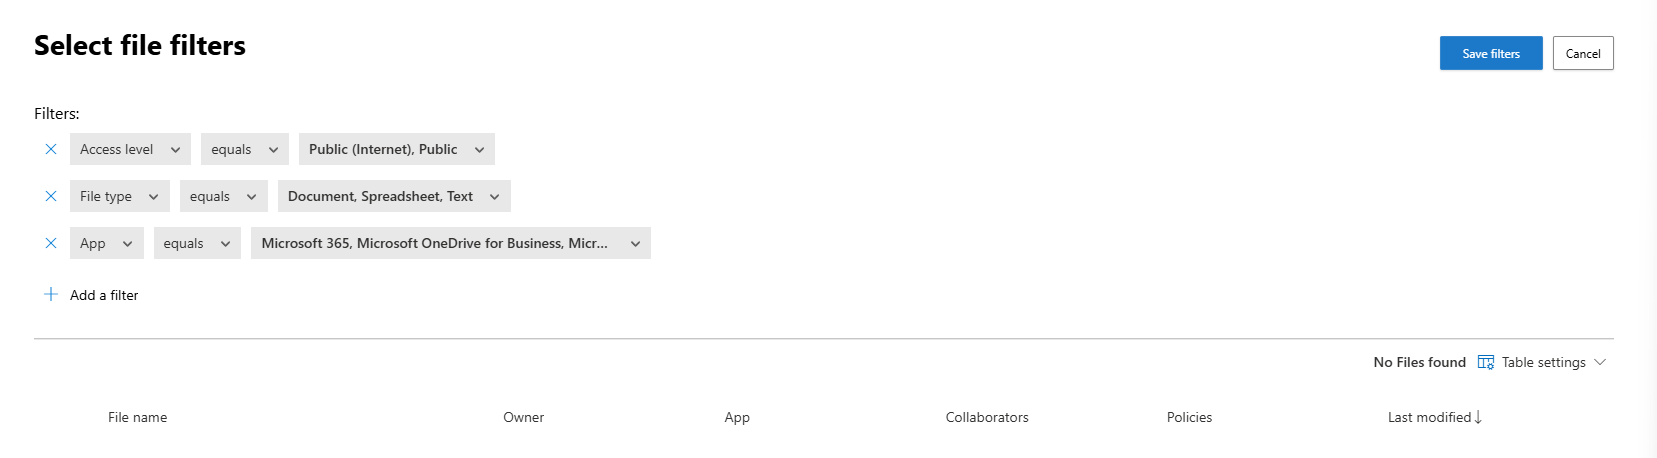
Step 6: Define Your Filters
This is where the magic happens. Filters define which files this policy applies to. Be as specific as possible to avoid false positives.
Example filters for our policy:
- Access level: Public
- File type: Document, Spreadsheet
- App: SharePoint Online, OneDrive for Business
Click Edit and preview results to see which files currently match your filters. This is your test run.
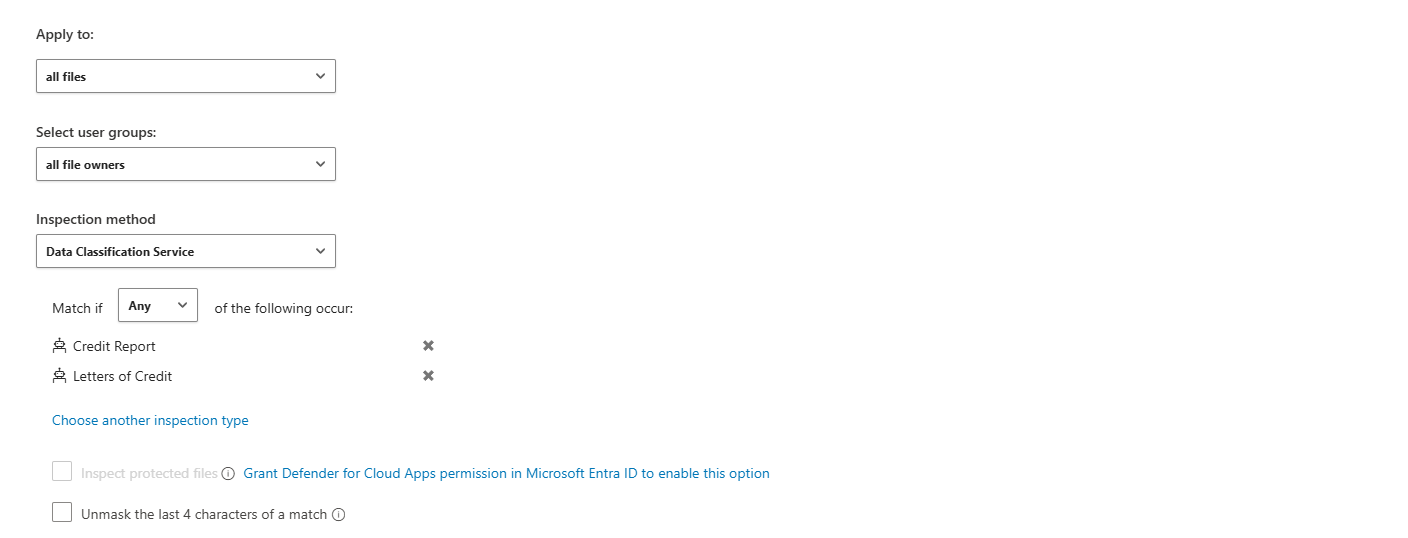
Step 7: Configure Content Inspection
If you're scanning file content (like looking for credit card numbers), configure the Content inspection method. The recommended option is Data Classification Services (DCS), which uses Microsoft's built-in DLP engine.
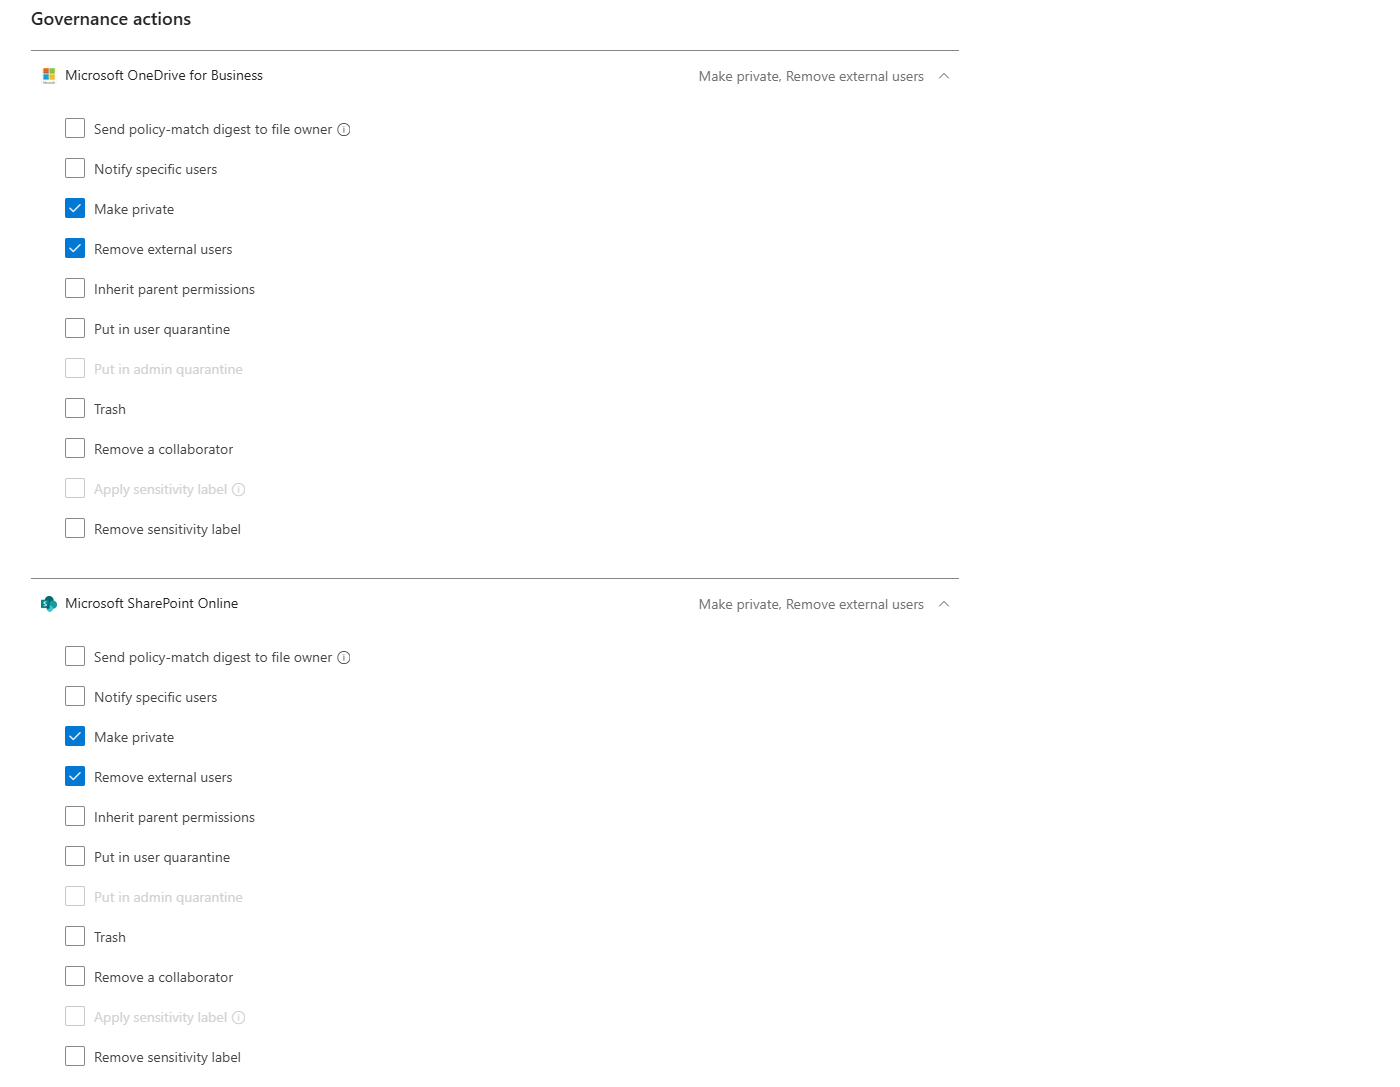
Step 8: Set Governance Actions
Now decide what happens when a file matches your policy. Options include:
- Remove external users (revoke external sharing permissions)
- Make private (remove public access)
- Put in user quarantine (move the file to a quarantine folder the user can access)
- Put in admin quarantine (move the file to an admin-controlled quarantine folder)
- Trash (move to the recycle bin)
- Apply sensitivity label
- Notify file owner
- Notify last file editor
- Send policy-match digest to file owner (a custom notification will be sent to the owner with a gentle reminder about DLP)

Warning: Be very careful with governance actions. Actions like "trash" or "remove sharing" are irreversible. Always test in audit mode first.
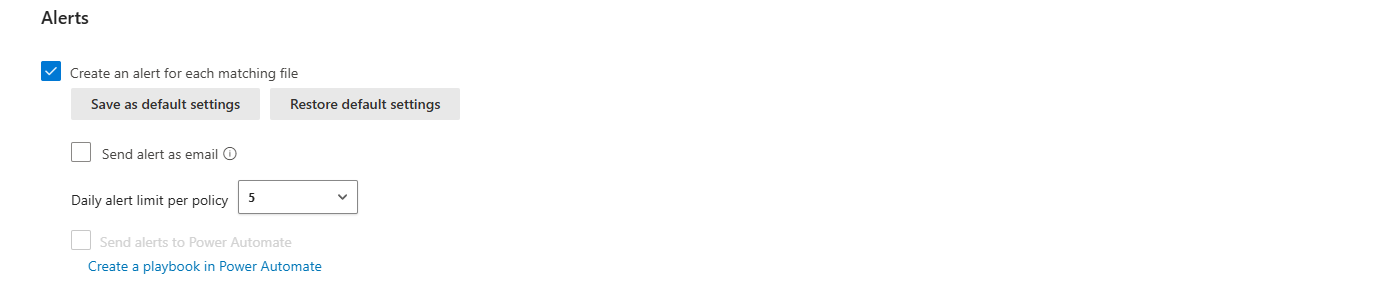
Step 9: Configure Alerts
In the Alerts section, decide if you want to create an alert for every match, send alerts via email, set a daily alert limit, or send alerts to Power Automate.
Step 10: Save and Enable
Click Create. The policy is now enabled and will start scanning immediately.
Testing Policies: Audit is Your Friend
Here's a golden rule: Never deploy a new policy with governance actions enabled on day one. You will cause chaos. Instead, create the policy without governance actions (or with only "Create an alert" enabled) and run it in audit mode for at least a few days.
During audit mode:
- The policy runs and detects matches.
- Alerts are generated.
- You can see exactly which files, users, or activities would have been affected.
- But no actions are taken (no files are quarantined, no users are suspended).
This gives you time to:
- Tune your filters to reduce false positives.
- Confirm the policy is working as expected.
- Get buy-in from stakeholders before you start blocking or quarantining things.
Once you're confident, edit the policy and enable governance actions.
Editing, Cloning, and Deleting Policies
Editing a Policy
Go to Policies > Policy management, find your policy, click the three dots at the end of the row, and select Edit. Make your changes and save. The policy will continue running with the new configuration.
Deleting a Policy
Click the three dots and select Delete. Be careful, deleting a policy is permanent. If you just want to stop a policy temporarily, disable it instead.
Disabling a Policy
Click the three dots and select Disable. The policy stops running, but remains in your policy list. You can re-enable it later by clicking Enable.

Policy Management Best Practices (Or: How Not to Shoot Yourself in the Foot)
- Start narrow, then expand. When creating filters, be as restrictive as possible. It's easier to broaden a policy later than to clean up the mess from an overly broad policy.
- Always test in audit mode first. Seriously. Don't skip this step.
- Use descriptive names and descriptions. Future you (or the next analyst) will thank you.
- Consolidate policies where possible. Instead of creating five separate file policies for SharePoint, OneDrive, Box, Dropbox, and Google Drive, create one policy that applies to all of them. This improves performance and simplifies management.
- Don't reset file policies in production. File policies have a "Reset results and apply actions again" checkbox. This forces a full rescan of all files covered by the policy, which can hammer performance. Only use this if absolutely necessary.
- Monitor your policies. Go to Policies > Policy management regularly and review the Count column to see how many matches each policy has. If a policy has zero matches for weeks, it might be misconfigured. If it has thousands, it might be too broad.
- Keep at least one file policy active. If all file policies are disabled or deleted for seven consecutive days, file monitoring is automatically disabled. You'll have to re-enable it manually.
- Use the daily alert limit. If a policy is generating hundreds of alerts per day, set a daily alert limit to avoid flooding your SOC queue. Note that governance actions are not impacted by the alert limit.

Integration with Microsoft Sentinel
When you enable the Microsoft Sentinel integration, MDCA alerts are automatically forwarded to Sentinel and converted into incidents. This gives you:
- Longer data retention (via Log Analytics).
- Centralised alerting across your entire environment.
- Correlation with on-premises events.
- Advanced hunting and automation via Sentinel playbooks.
To enable the integration, configure the Defender XDR connector in Sentinel and enable Cloud App Events.

Integration with Defender XDR
Defender for Cloud Apps is a workload within Microsoft Defender XDR. All MDCA alerts appear in the unified Defender XDR alerts queue, where they can be correlated with alerts from Defender for Endpoint, Defender for Identity, and Defender for Office 365.
This unified view allows you to see the full attack chain. For example, an MDCA alert for "mass download by a single user" might correlate with a Defender for Endpoint alert for "suspicious process execution" on the same device, revealing a compromised endpoint exfiltrating data.
Integration with Entra ID
Many governance actions (like suspending a user or requiring reauthentication) rely on Entra ID (formerly Azure AD). When a policy is triggered, MDCA can automatically:
- Suspend the user account in Entra ID.
- Force the user to reauthenticate.
- Require step-up authentication (MFA).
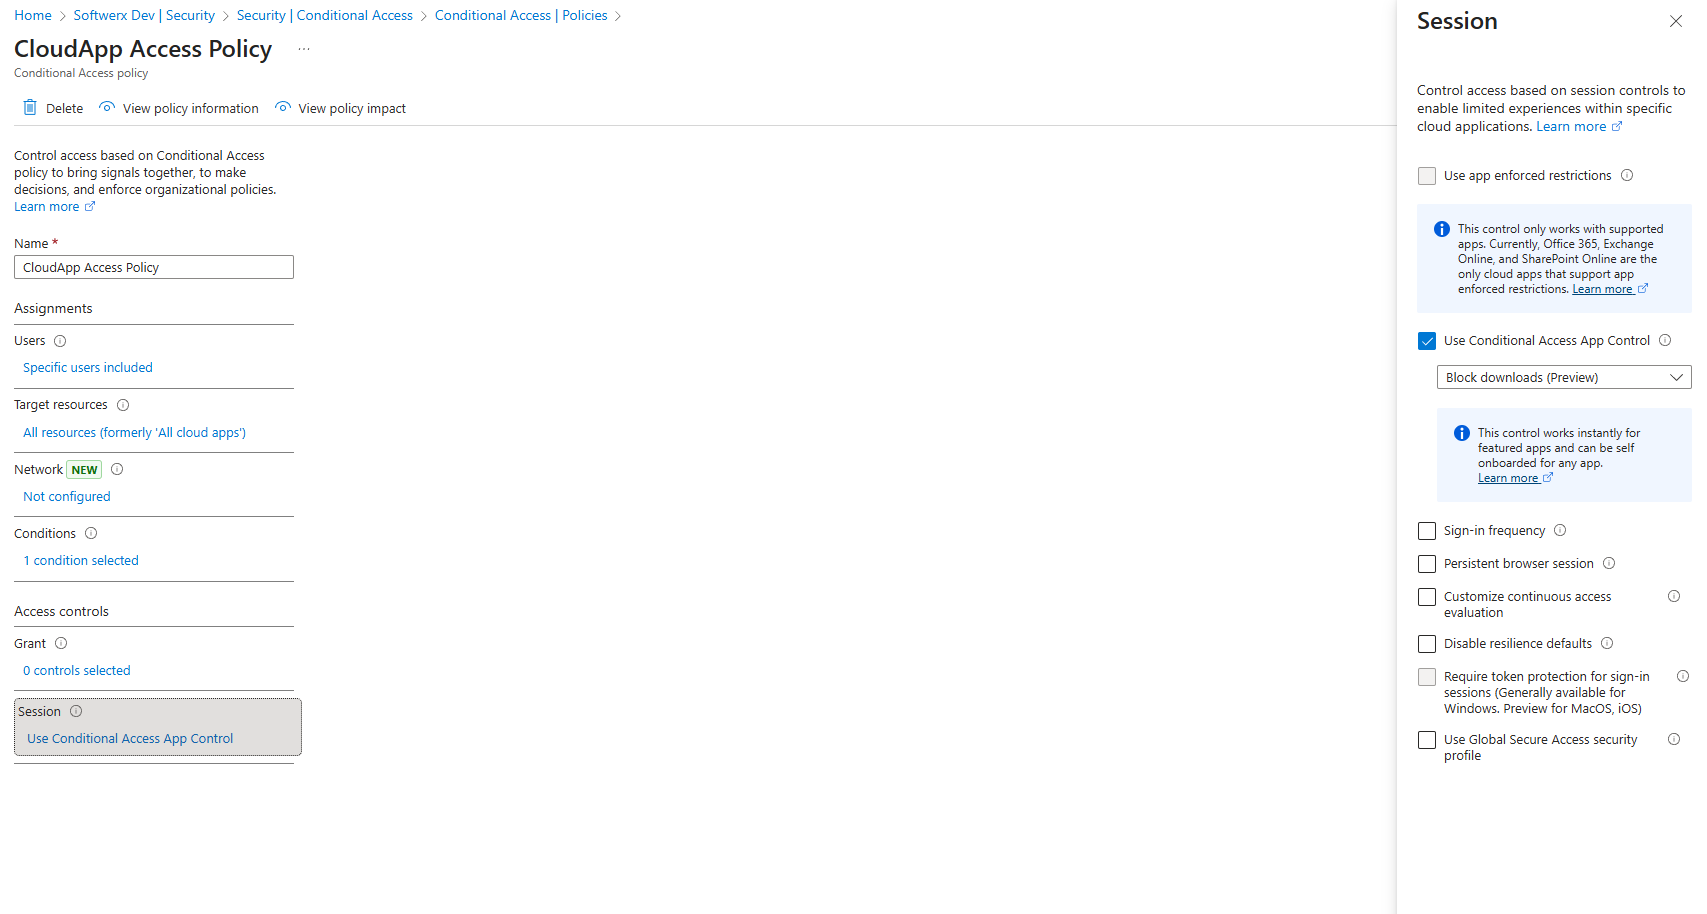
This is where conditional access policies come into play. You can create a Conditional Access policy in Entra ID that uses Conditional Access App Control to route app sessions through MDCA. This enables real-time session policies.
You now have the tools to move from passive visibility to active enforcement in Defender for Cloud Apps. You understand the different policy types, how to create and manage them, how to test them safely, and how to integrate them with the rest of your security stack.
Policies are where the rubber meets the road. They're how you stop breaches, enforce compliance, protect data, and scale your SOC operations. They're how you turn Defender for Cloud Apps from a nice-to-have monitoring tool into a critical pillar of your security architecture.
So get out there. Create some policies. Test them. Tune them. Break things (in a test environment, obviously). Learn what works for your organisation. And remember: visibility without control is just voyeurism. Policies give you control.
Class dismissed.