Microsoft Sentinel Rule Tuning: Kick the Noise, Keep the Signal

Alright, class. Welcome back.
You've come a long way. You've deployed Sentinel, you're shipping logs, you've created analytic rules (maybe you even used my script to enable a few hundred at once), and you've got a handle on KQL basics. You feel like the master of your own little security universe.
And then, it begins.
The drip, drip, drip of alerts. Soon it's a torrent. The beautiful, clean incident queue you built becomes a firehose of notifications with seemingly no end to it!
Congratulations, you've just hit the next boss level in your Sentinel journey: Alert Fatigue.

This is the point where a good analyst starts thinking like an engineer. Tuning these rules isn't just about making your life easier; it's about making Sentinel smarter. It's a critical skill that will make you infinitely more valuable and is a huge step up the cybersecurity career ladder.
First, Be a Detective, Not a Wrecking Ball
Before you touch a single line of code, your first job is to identify the noisy rules and understand why they're firing. Open up the incident, look at the entities, and most importantly, read the KQL in the analytic rule itself. What is it actually looking for? Understanding the logic is 90% of the battle, and I cannot stress this enough; it's crucial to understand why the query is triggering.
Once you understand the 'what', you have two primary weapons (for those more advanced, you have more weapons in your stash, but we are going to keep it as simple as we can for the time being) in your tuning arsenal. Let's learn when to use them.
Weapon #1: The "Don't Bother Me" Button (Automation Rules)
This is for alerts that are technically correct, but operationally expected. The rule is working perfectly, but it's flagging legitimate activity you don't need a human to review every single time.
Scenario: An admin in your IT department, let's call him Dave, is adding a dozen new clients to your Cross-Tenant collaboration settings. He'll be doing this every week for the next month. Your rule, "Cross Tenant Access Settings Changed," starts firing every time Dave does his job.
The Wrong Way (The Wrecking Ball):
The first instinct for many is to jump into the rule's KQL and add | where Account != "Dave@domain.com".
Don't do this.
Why? You've just created a permanent blind spot. What if Dave's account gets compromised next year and a real attacker starts messing with those settings? You'll never get an alert. You've sacrificed visibility for convenience.
The Right Way (The Scalpel):
Use an Automation Rule. This lets the incident still be created—giving you a perfect audit trail—but handles it automatically so it doesn't clutter your queue.
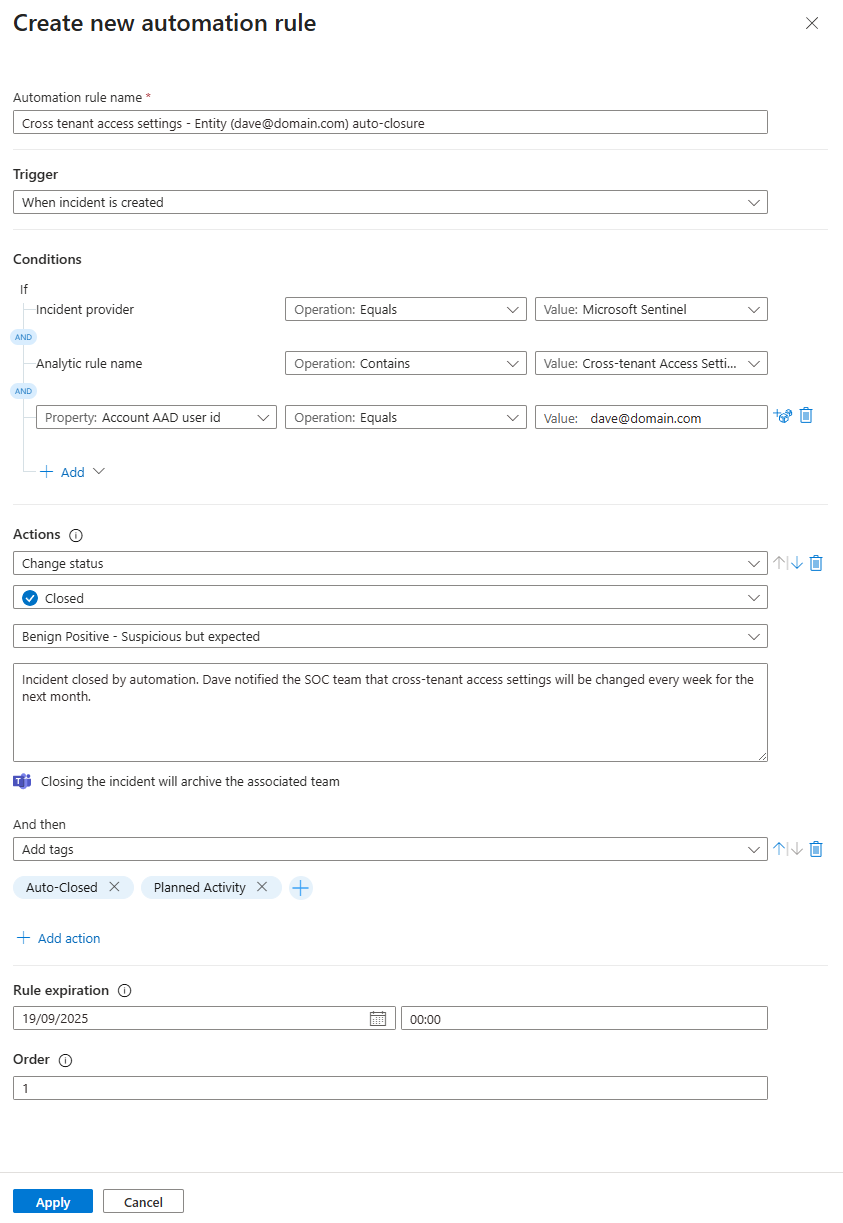
- Go to Sentinel > Automation and create a new Automation rule.
- Condition: Set it to trigger
If... Incident provider equals Microsoft SentinelANDIf... Analytics rule name equals Cross Tenant Access Settings ChangedANDIf... Account entity equals Dave's UPN. - Action: Tell it to
Change statusto Closed with a reason of Benign Positive. - Rule expiration: The rule will be
automatically disabledat the given expiration date. - Bonus: You can also have it add a tag like
Auto-Closed: Planned Admin Activityand even assign it to a "graveyard" owner so you can track them easily.
Beautiful. The alert fires, the automation rule sees it's just Dave doing Dave things, closes it, tags it, and your SOC team never even gets the notification. The noise is gone, but the signal (the audit trail) is still there if you ever need it.
Weapon #2: Performing Brain Surgery (KQL Tuning)
This is for alerts where the core logic is too broad or fundamentally flawed. The rule is just too chatty by nature, and you need to make it smarter by surgically modifying its KQL.
Scenario: You're using a rule to detect "MFA Rejected by User." It's a great idea, but it's firing constantly. An employee on a shaky Wi-Fi connection might accidentally deny an MFA push, and you don't need a high-severity incident for that.
Let's look at the KQL for a rule like this. It can look intimidating, but it's just a set of filters and joins.
// The original query might look something like this beast...
let riskScoreCutoff = 3;
SigninLogs
| where ResultType == 500121
| extend additionalDetails_ = tostring(Status.additionalDetails)
| where additionalDetails_ =~ "MFA denied; user declined the authentication" or additionalDetails_ has "fraud"
| summarize StartTime = min(TimeGenerated), EndTIme = max(TimeGenerated) by UserPrincipalName, UserId, AADTenantId, FailedIPAddress = IPAddress
| extend Name = tostring(split(UserPrincipalName,'@',0)[0]), UPNSuffix = tostring(split(UserPrincipalName,'@',1)[0])
| join kind=leftouter (IdentityInfo | ... ) on UserPrincipalName
| join kind=leftouter (BehaviorAnalytics | ... ) on FailedIPAddress, Name
| extend UEBARiskScore = MaxInvestigationScore
| where  UEBARiskScore > riskScoreCutoff
| sort by UEBARiskScore desc
Here’s how we can make this query smarter:
- Exclude Your Safe Zones: Your corporate offices are trusted locations. A user denying an MFA prompt from inside the building is far less suspicious than one from a random IP in a country you don't operate in.
The Fix: Use a watchlist of your corporate IP ranges and add this line early in the query
// PROFESSOR'S NOTE: You can add these lines at the very top of the query.
let corporateIPs = _GetWatchlist('CorporateIPs')| project SearchKey;
let riskScoreCutoff = 3;
SigninLogs
| where IPAddress !in (corporateIPs)
// ... - Check the Device Posture: Is the user on a company laptop that is fully managed and compliant? Or are they on a personal device from a Starbucks? The context matters.
The Fix: We don't need a complex join for this. The compliance state is right there in the SigninLogs table, though it can be tricky to parse. We'll add a line to reliably check if the device is compliant, regardless of how the log formats the data.
This tells the query: "Only show me results where the device is confirmed to be non-compliant or there is no compliance information", neat, right?
// PROFESSOR'S NOTE: Add this after the first "where" in the query
let riskScoreCutoff = 3;
SigninLogs
| where ResultType == 500121
| extend isCompliant = coalesce(tobool(DeviceDetail.isCompliant), false)
| where isCompliant == false
// ...- Focus on High-Value Targets: An MFA deny for a regular user is interesting. An MFA deny for a Global Admin is a potential catastrophe. You can adjust the current analytic rule or create a separate one if needed with "High" Severity, this way you know something is going on..
The Fix: The original query already joins with IdentityInfo, which contains user tags and roles. We can leverage that to filter for high-privilege accounts
// PROFESSOR'S NOTE: Add this at the end to filter your results.
| where AssignedRoles has "Global Administrator" or Tags has "VIP"- Adjust the Threshold: The provided query already has a great tuning lever:
riskScoreCutoff. This uses UEBA data to score the risk of the sign-in. If you're getting too many low-quality alerts, simply raising that number from3to5can make a huge difference.
By layering these conditions, you transform a noisy, generic rule into a high-fidelity signal that alerts you to activity that is truly anomalous and risky.
The Never-Ending Story
Rule tuning isn't a "set it and forget it" task. It's a continuous process of refinement. As your organisation changes, so will your definition of "noise."
But by mastering these two core techniques—auto-closing expected events and surgically refining KQL for unexpected ones—you'll move from being a minion in the alert queue to being the dungeon master of your domain.
Class dismissed.