Defender for Office 365 Policy Configuration: Anti-Phishing, Anti-Spam, Malware, Safe Links
All right class.
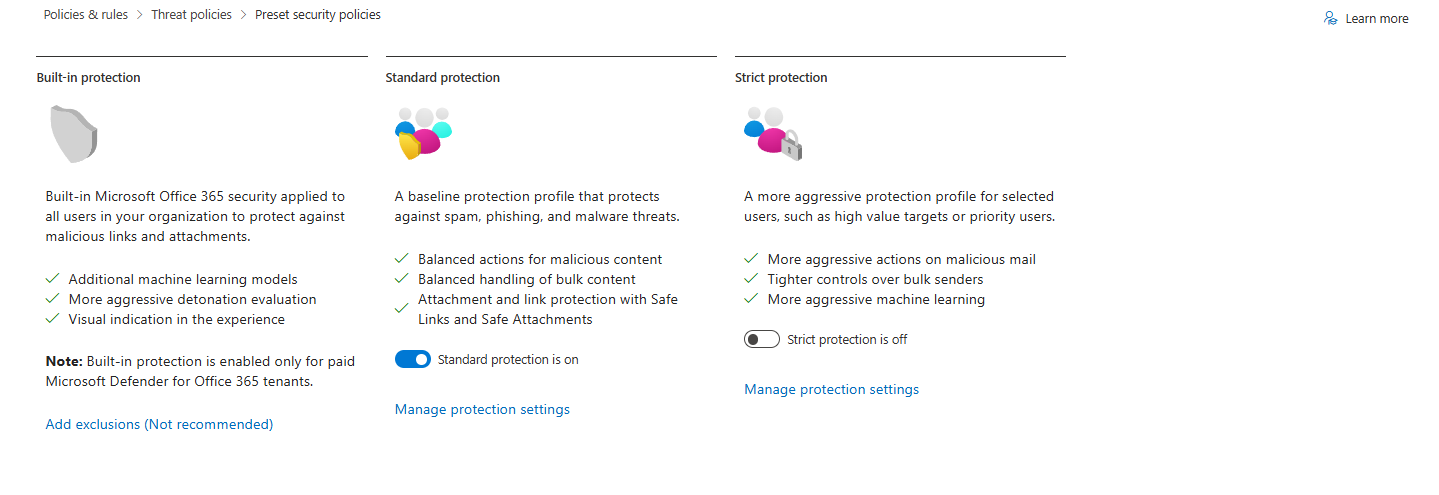
Microsoft's preset policies are marketing fiction. They sound good in documentation. In production? The standard may be too permissive and miss sophisticated attacks. Strict blocks your partner integrations, and your users complain to your boss within hours. They are a start but usually not a solution in the long run, and should always be tested in the environment. Presets aren’t perfect, but they’re not the enemy.
Here's what actually happens: You deploy Strict for everyone, your helpdesk drowns in "why can't I open this PDF" tickets, you disable half the policies to reduce noise, and now you're basically running EOP with a Defender license. Total waste.
The fix isn't to run the presets as-is. The fix is to understand what each policy actually does, which ones matter for your environment, and how to tune them so you catch threats without breaking business email.
The Working Model
Use Strict for priority accounts only (CEO, CFO, exec team). They don't need external marketing emails. They don't need partner integrations forwarding through their mailbox. They need maximum protection because if they're compromised, everything downstream is compromised.
Use a custom tuned policy for general users and non-interactive mailboxes (the 499 people who actually need to work). This policy gets adjusted based on your environment: your business email patterns, your approved third-party integrations, and your acceptable false positive rate.
That's it. Two policy groups. Priority Accounts (Strict), General Users/Service Accounts (Custom)
Anti-Phishing: Where Most Orgs Make Mistakes
This is where configuration gets real. Defender's anti-phishing adds three layers: mailbox intelligence, impersonation protection, and spoof intelligence.
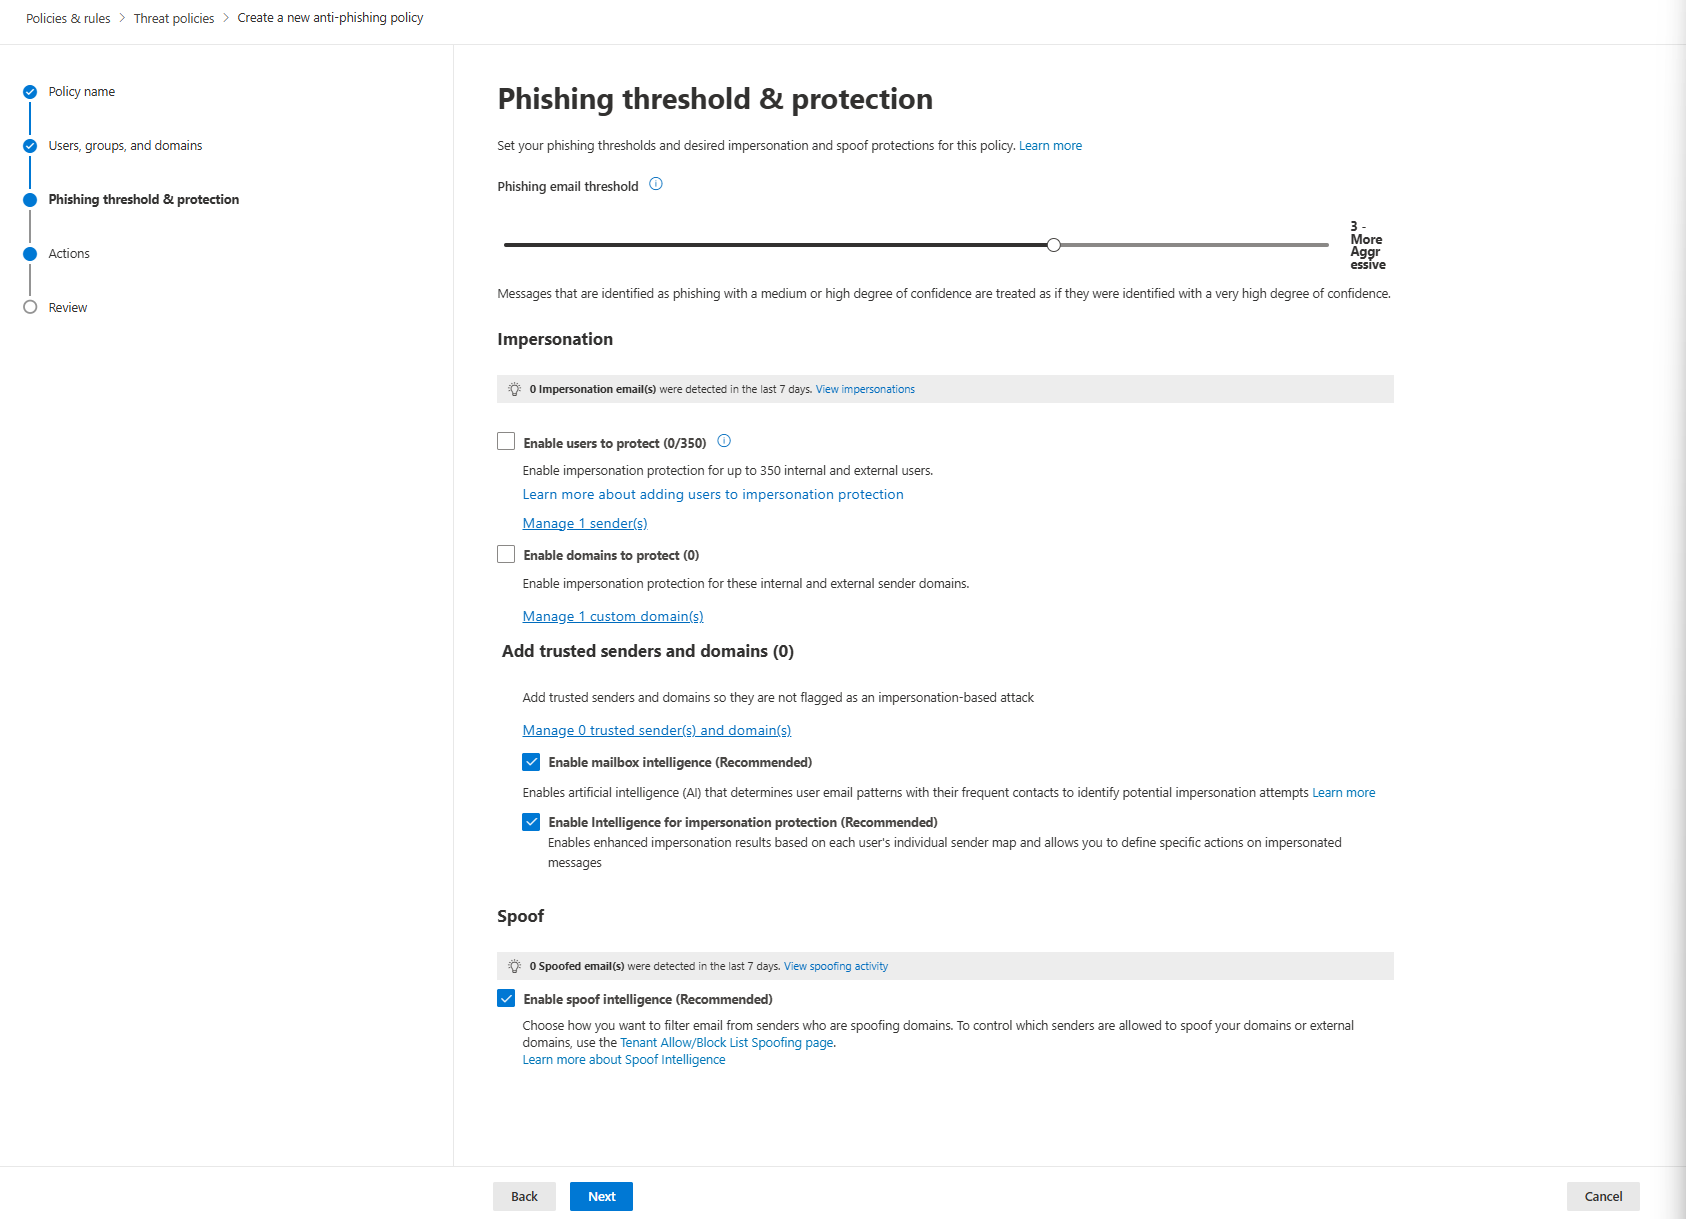
Phishing Email Threshold

Standard preset uses Level 3. Strict uses Level 4. Default is Level 1. You can't change these in presets; if you need different settings, create a custom policy.
For custom policies: Microsoft recommends Level 3 for Standard (general users). Use Level 4 for Strict (priority accounts).
If Level 3 causes too many false positives, don't lower the threshold! Instead, add trusted senders and adjust impersonation protection settings. The threshold controls sensitivity; tuning trusted domains controls exceptions.
Impersonation Protection
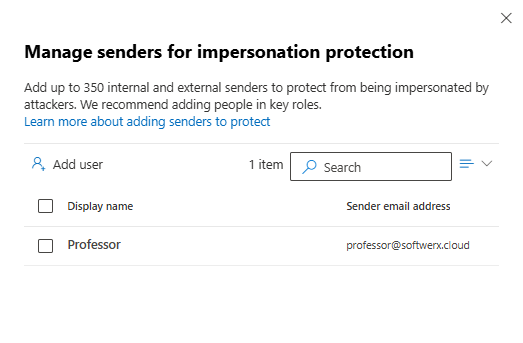
You can add up to 350 users. External emails claiming to be from those users get flagged. Add your CEO, CFO, or anyone with direct financial authority. Keep it under 50 people, or your helpdesk drowns in false positives.
Critical detail: User impersonation protection only triggers if the sender and recipient have never emailed before. If they've communicated previously, mailbox intelligence takes over instead.
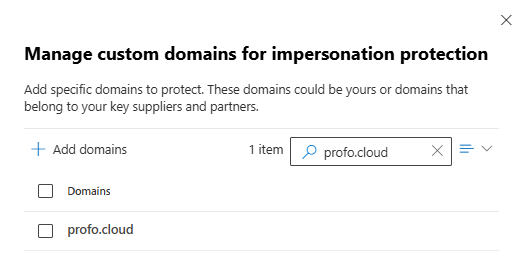
Domain Impersonation
Your organisation's domains automatically get protection. Add up to 50 custom domains (typosquats, variants). Don't add more than 2-3 unless you have a specific reason. Subdomains must be added separately.
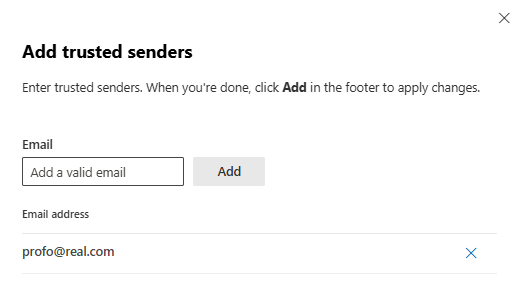
Trusted Senders and Domains
You can exclude specific senders and domains from impersonation protection. Start with zero. Add as false positives appear, review quarterly.
Mailbox Intelligence
Enable it; the same goes for intelligence for impersonation protection. Defender learns individual user behaviour over 30 days. After that, emails deviating from patterns get flagged. Standard preset moves them to Junk. Strict quarantines them.

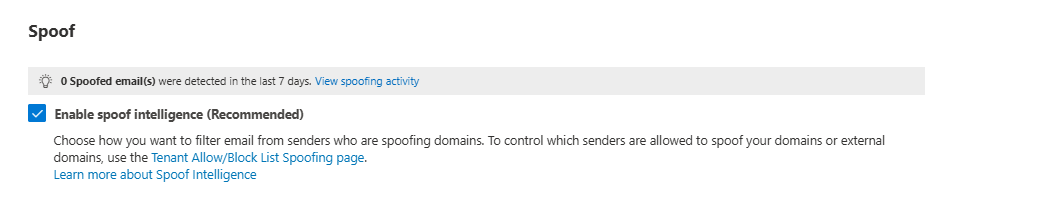
Spoof Intelligence
If your DMARC is set to reject, spoof intelligence is redundant. If DMARC is in monitor mode, spoof intelligence catches what DMARC didn't.
Custom Policy Recommendations (Microsoft's Official Settings)
General Users Custom Policy:
Phishing email threshold: 3

Impersonation:
  ☑ Enable users to protect (0/350)
    - Add: CEO, CFO, finance leads
  ☑ Enable domains to protect (0)
    - Your primary domain
    - Add 1-2 typosquats

Add trusted senders and domains:
  - Start at 0, add as false positives appear

☑ Enable mailbox intelligence (Recommended) - CHECKED
☑ Enable Intelligence for impersonation protection (Recommended) - CHECKED

Spoof:
☑ Enable spoof intelligence (Recommended) - CHECKED

Message actions:

☑ Honor DMARC record policy when the message is detected as spoof - CHECKED
  - If the message is detected as spoof and DMARC Policy is set to p=quarantine: Quarantine the message
  - If the message is detected as spoof and DMARC Policy is set to p=reject: Reject the message
  - If the message is detected as spoof by spoof intelligence:
Quarantine the message
  - Apply quarantine policy: AdminOnlyAccessPolicy (DO NOT ENABLE THAT FOR USERS)

Safety tips & indicators:
  ☑ Show first contact safety tip (Recommended) - CHECKED
  ☑ Show (?) for unauthenticated senders for spoof - CHECKED
  ☑ Show "via" tag - CHECKED
Priority Account Custom Policy:
Phishing email threshold: 4

Impersonation:
  ☑ Enable users to protect (0/350)
    - Add: All executives (entire exec team)
  ☑ Enable domains to protect (0)
    - Your primary domain
    - Add all custom domains you own (max 50)

Add trusted senders and domains:
  - None (0) - NO EXCEPTIONS

☑ Enable mailbox intelligence (Recommended) - CHECKED
☑ Enable Intelligence for impersonation protection (Recommended) - CHECKED

Spoof:
☑ Enable spoof intelligence (Recommended) - CHECKED

☑ Honor DMARC record policy when the message is detected as spoof - CHECKED
  - If the message is detected as spoof and DMARC Policy is set to p=quarantine: Quarantine the message
  - If the message is detected as spoof and DMARC Policy is set to p=reject: Reject the message
  - If the message is detected as spoof by spoof intelligence:
Quarantine the message
  - Apply quarantine policy: AdminOnlyAccessPolicy (DO NOT ENABLE THAT FOR USERS)

Safety tips & indicators:
  ☑ Show first contact safety tip (Recommended) - CHECKED
  ☑ Show (?) for unauthenticated senders for spoof - CHECKED
  ☑ Show "via" tag - CHECKED
There you go - one policy set up properly 😼
Anti-Spam: Tuning the Noise
Connection filtering is where most people create security holes without realising it.
The IP allow list bypasses everything. You whitelist a partner's static IP, and congratulations, all their mail skips spam checks completely. If that IP gets compromised, gets repurposed by a hosting provider, or your partner gets hacked, you're now accepting malware with open arms. That's not a feature. That's a liability.
Only use connection filter allow lists for truly trusted partners with genuinely static IPs. Review it quarterly anyway because IP ranges change, partnerships shift, and infrastructure gets reused faster than you think.
Why Your Bulk Email Threshold is Wrong
The default bulk threshold is 7. Most orgs leave it there and complain about newsletter emails disappearing. The Bulk Complaint Level (BCL) is Microsoft's internal score for how "bulky" an email looks; newsletters score high. When BCL hits 7 or above, the message gets flagged.
Set it to 6. Run it for a week. Your legitimate newsletters still get through. Your spam-looking newsletters get quarantined, which is fine. If users scream about missing their marketing emails, just ignore them. We are here to fix your security, not to please someone's favourite newsletter with Black Friday offers. If your Junk folder fills up with actual bulk mail, lower it to 5.
That's one of the greatest mistakes I can quite often spot: Nobody is tuning it. They deploy at 7 and forget. Then their CEO is getting bombarded by the spam and newsletters, and someone is trying to block each email manually without realising this option exists.
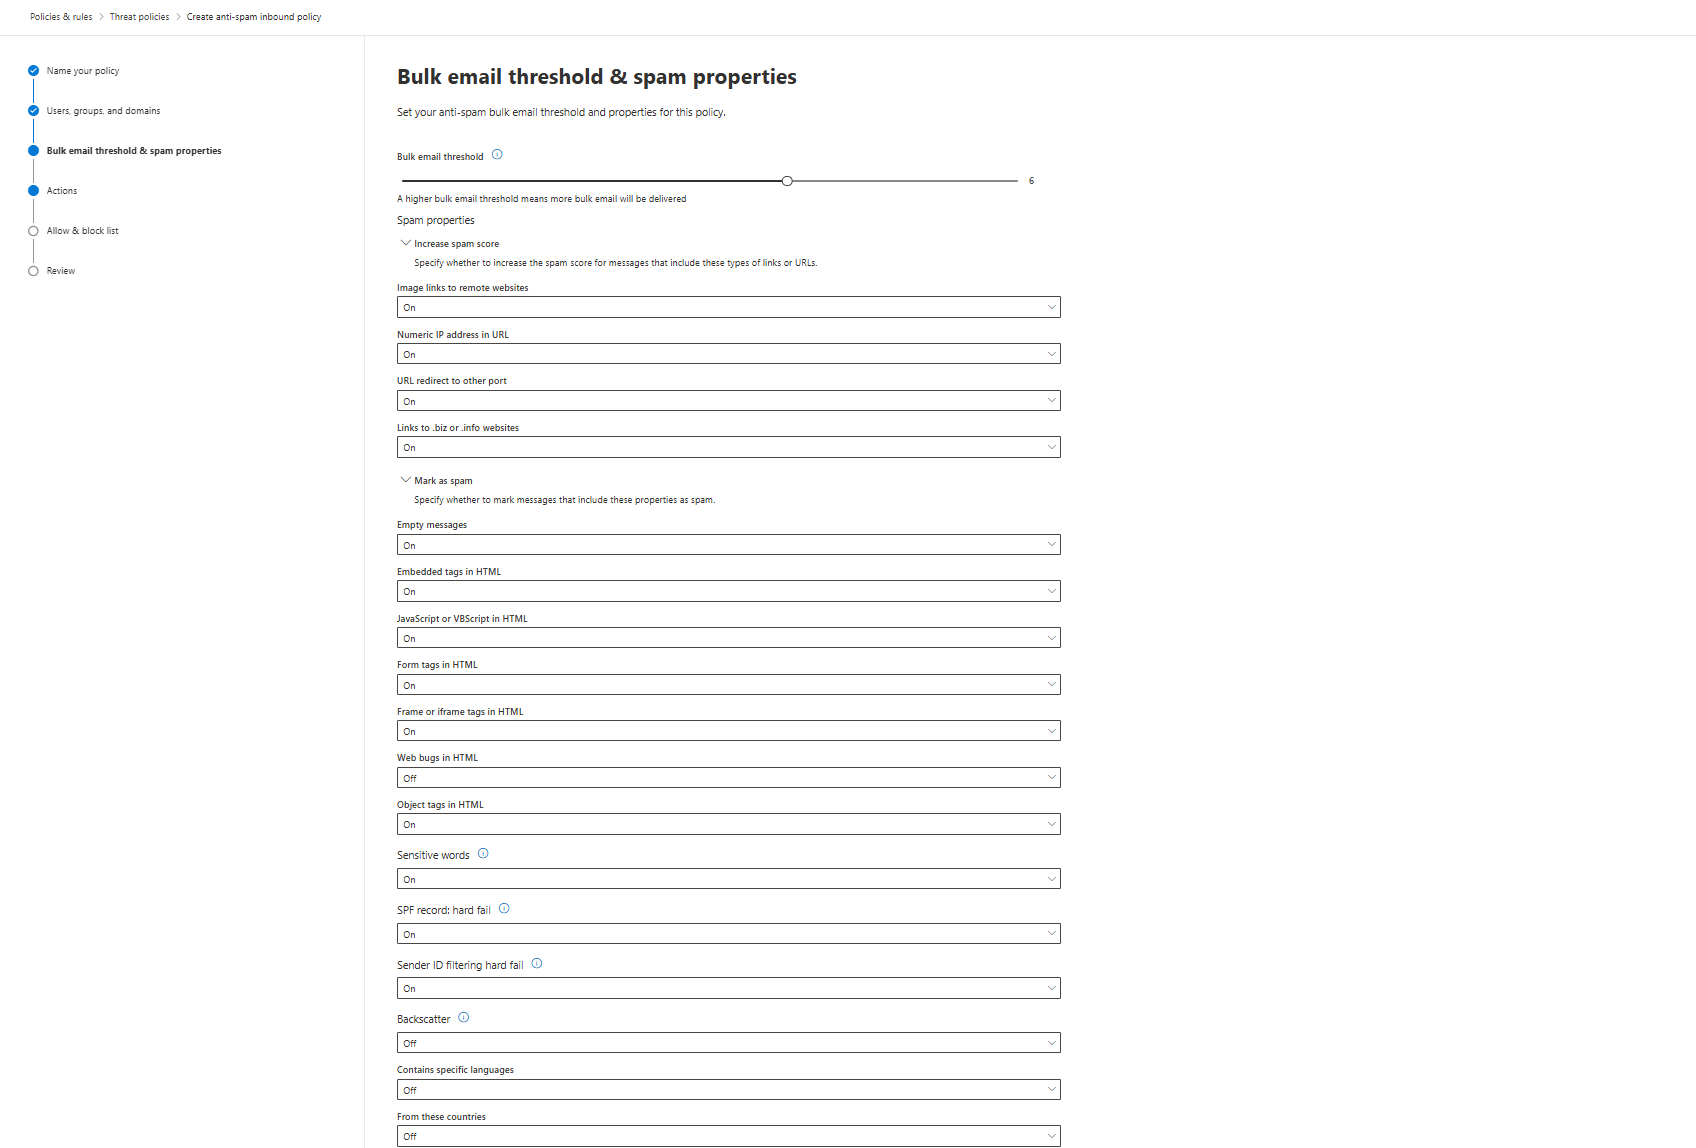
Advanced Spam Filter: Microsoft Gives You Off, You Need It On
This is where you stop following Microsoft's defaults and start following operational security.
Microsoft ships the Advanced Spam Filter (ASF) settings disabled by default. That's fine for risk-averse enterprises with dedicated security teams. You're building Defender for actual threats.
Turn these ON. Yes, on. This is where most people mess this up; they assume Microsoft's defaults are correct. They're not. They're conservative.
Conservative ≠ Secure.
ENABLE:
- Empty messages (spammers validate active addresses with empty tests)
- JavaScript or VBScript in HTML (malware injection vector)
- Form tags in HTML (phishing credential harvesting pages)
- Frame or iframe tags in HTML (hidden phishing redirects)
- Object tags in HTML (exploit kit delivery)
- Embed tags in HTML (malware or tracking scripts)
- Sensitive word list (catches known spam indicators)
- SPF record hard fail (sender authentication bypass attempt)
- Sender ID filtering hard fail (sender authentication bypass)
Increase spam score - ENABLE:
- Image links to remote websites
- URL redirect to other port
- Links to .biz or .info websites
- Numeric IP address in URL
Keep DISABLED - Too many false positives (you can of course test it first, ideally enable - give it a week, then decide)
- Web bugs in HTML (legitimate marketing uses these constantly)
- NDR backscatter (generates noise from legitimate bounce messages)
At the top of that, you can use the option for Contains specific languages and From these countries, though don't expect great results from it; it's just too easy nowadays to use paid services to send spam from any location/language.
Why enable aggressive policy when Microsoft doesn't? Because you control the quarantine. You're not locked into a one-way gate. You can review, release, and learn. A form tag landing in quarantine is worth investigating. The alternative is letting phishing credential harvesting pages land in inboxes.
Will you get some false positives? Yes. That's the trade-off. After 30 days of tuning, you'll know which ones are noise, and you'll adjust.
Anti-Spam Actions Configuration
This is where you actually define what happens to spam. Don't skip this page, or you'll deploy with useless defaults.
Spam and High-Confidence Spam Settings:
First 30 days: If using Defender for Office 365 first time, move both to the Junk Email folder. You're tuning. You need visibility. Users need to see what's being filtered.
After 30 days: Switch spam to Quarantine, keep bulk (BCL) in Junk. High-confidence spam always Quarantine with AdminOnlyAccessPolicy.
Phishing Actions:
- Regular phishing: Quarantine with DefaultFullAccessPolicy (allows user self-service)
- High-confidence phishing: Quarantine with AdminOnlyAccessPolicy (users cannot release, admins only)
This distinction matters. You're saying "suspicious sender behaviour" can go to quarantine, but users can fight back if it's legitimate. "High-confidence phishing" (Microsoft's strongest verdict) doesn't get that courtesy. In some of the environments, you may set up a clear message from the start: "We are here to decide whether the email is malicious or not; you don't get to decide otherwise".
Bulk Complaint Level (BCL) Action:
Move to Junk. Not Quarantine. BCL is newsletters, marketing, and broadcast mail. Users signed up for this stuff. It belongs in Junk, where they can find it, not Quarantine, where they have to request release.
Retention and Other Settings:
- Retain spam in quarantine: 30 days (not default 15). Gives you time to investigate patterns.
- Intra-Organizational messages: High-confidence phishing messages
- Safety tips: Enable spam safety tips and ZAP (both phishing and spam)

What NOT to do:
Don't set everything to Quarantine immediately. Don't use AdminOnlyAccessPolicy for regular spam, only for high-confidence phishing. Don't reduce retention below 30 days during the tuning window.
Allow/Block Lists: How to Accidentally Leak Your Security
This is where people burn themselves catastrophically.
Your CEO gets a legitimate email from a partner that Defender flags. The CEO calls IT. You add the sender to the allow list to fix it. The sender's email account gets compromised 6 months later. Now every email from that hijacked account lands directly in inboxes because you permanently exempted it.
Don't add senders to allow lists. Ever. Use "Not Spam" reports instead. User clicks "Report as not spam" → System learns the sender is legitimate → Future emails from that sender score differently → No permanent bypass. No security hole.
Same rule for block lists: block domains, not individual addresses. Attackers rotate email addresses constantly. You'll be chasing your tail blocking sender@attacker1.com, sender@attacker2.com, sender@attacker3.com forever. It's not a strategy. It's a failure mode.
Let the spam filter handle it. Watch the trends. If one domain is consistently sending garbage, block the domain once, not every address.
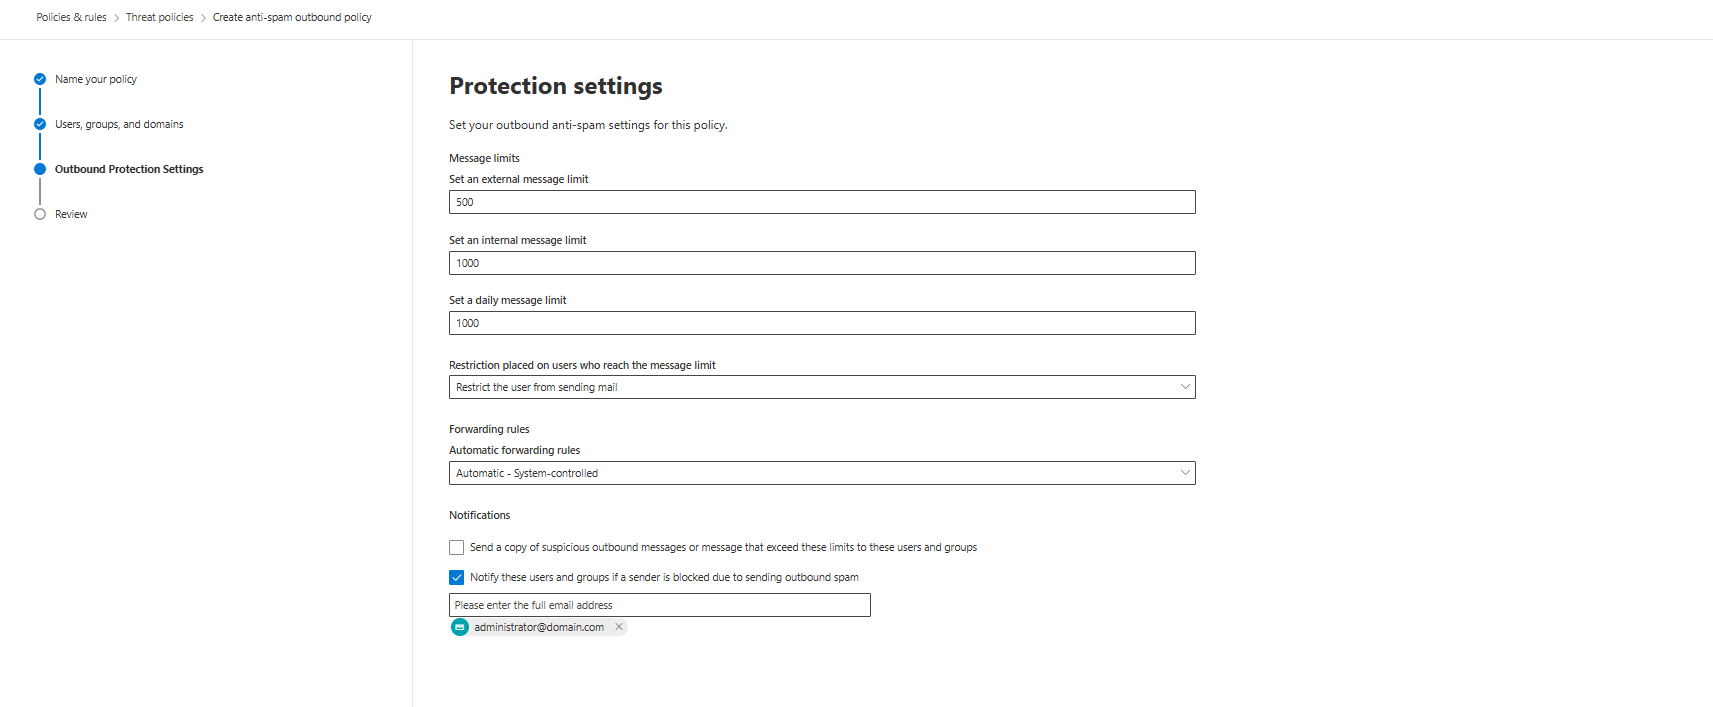
Outbound Protection: Stopping Your Compromised Users Before They Wreck Your Reputation
Outbound spam protection isn't about catching your legitimate users. It's about catching compromised accounts before they send 50,000 emails to external partners.
Default limits (and you should enforce them as defaults):
- 500 messages per hour to external recipients
- 1000 messages per hour to internal recipients
- 1000 messages per day total
When a user hits the limit, restrict them immediately. Don't wait until the next day. A compromised account sending 2000 emails in 90 minutes is an active incident happening right now.
Automatic forwarding: Set to System-controlled. This blocks most mass-forwarding attacks without breaking manual forwarding.
Don't spam users with notifications about their outbound blocks. You can set up a quick notification when a user is getting blocked (in some cases, you may want to create a separate policy for some of the folks, especially marketing in bigger companies love to send massive amounts of messages)
Before You Go Live: Week One Checklist
- Bulk threshold deployed at 6 (not default 7)
- All ASF aggressive settings enabled
- Spam going to Junk, not Quarantine (30-day tuning window)
- High-confidence spam going to Quarantine
- Allow/Block lists verified empty (or at least blocked by domain)
- Admin added to daily quarantine review rotation
- Users trained on "Report as Spam" workflow
- Outbound limits set to 500/1000/1000
- Tested with sandbox email: confirm ASF catches script injection
If you skip any of this, you're not deploying Defender. You're decorating EOP.
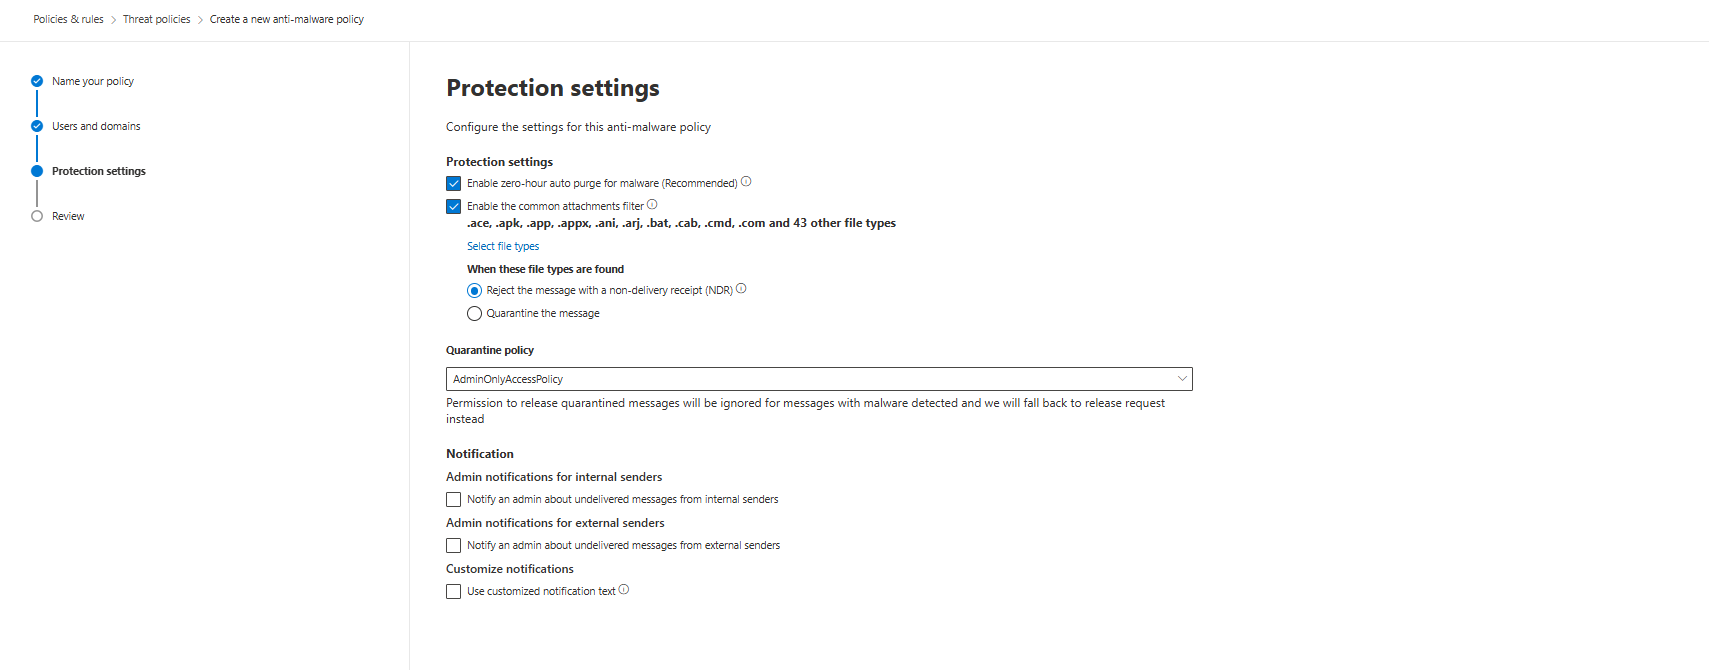
Anti-Malware: Block the File Types, Leave Everything Else Alone
Malware protection scans attachments and blocks dangerous file types. You can't tune detection; Microsoft handles that. You just need to pick which file types belong in your email. That's it.
What's Blocked by Default
50+ file types come blocked: executables (exe, msi, cmd), scripts (vbs, wsh), Office macros (docm), libraries (dll, sys). These are solid. Don't remove any.
What You Should Add
Always block:
- Executables: exe, com, cmd, bat, msi, scr, dll
- Scripts: js, ps1
- Macro-enabled Office: xlsm, pptm
Always block (high-risk vectors):
- Archives: zip, rar (can hide executables)
- Office macros: wll (Word add-ins)
- Disk images: iso, img (can contain executables)
Why? These file types don't belong in an email. If someone needs to send code, executables, or disk images, that's a business process problem (use GitHub, OneDrive, and plenty of other options available that can be scanned with Defender products). Email shouldn't be the transfer mechanism for files.
Everything Else: Ask Your Business
PDF, docx, xlsx, jpeg, decide based on what your org actually uses. Legal firm? Definitely allow PDF. Manufacturing? Maybe allow CAD files. You decide.
Configuration
Enable zero-hour purge for malware
Reject with NDR (default, keep it): External senders get a bounce email. The message never lands. This is correct.
Only use Quarantine if: You're specifically setting an exception for internal users who legitimately need to send dangerous files (which is rare and should be questioned).
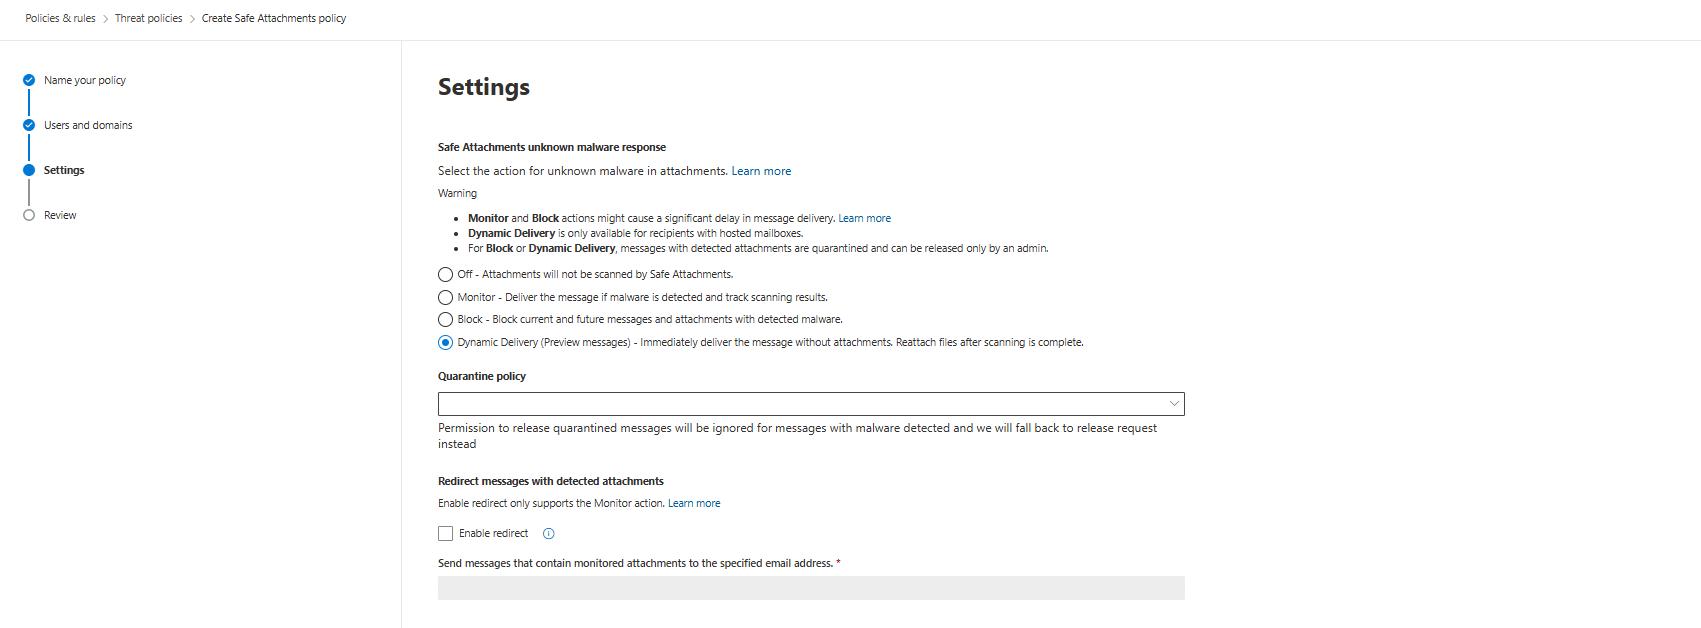
Safe Attachments: Sandboxing That Actually Works
Dynamic Delivery is the default, and it's usually right. Email arrives, attachment gets extracted, sandbox runs it, placeholder sent to user saying "Attachment scanning." Real attachment delivers once scanning completes (usually 5-15 minutes, depending on file complexity and complexity of analysis).
User sees the placeholder. They read the email. Email content gives context. When the attachment shows up, they understand what it is. False positives don't confuse.
Important: You cannot manually set a scanning timeout. The system determines scan time based on file behaviour and complexity. Don't expect or configure for a specific time window.
Block mode quarantines suspected attachments. Important distinction: Only administrators can review, release, or delete blocked attachments by default. Users cannot access their own quarantined attachments.
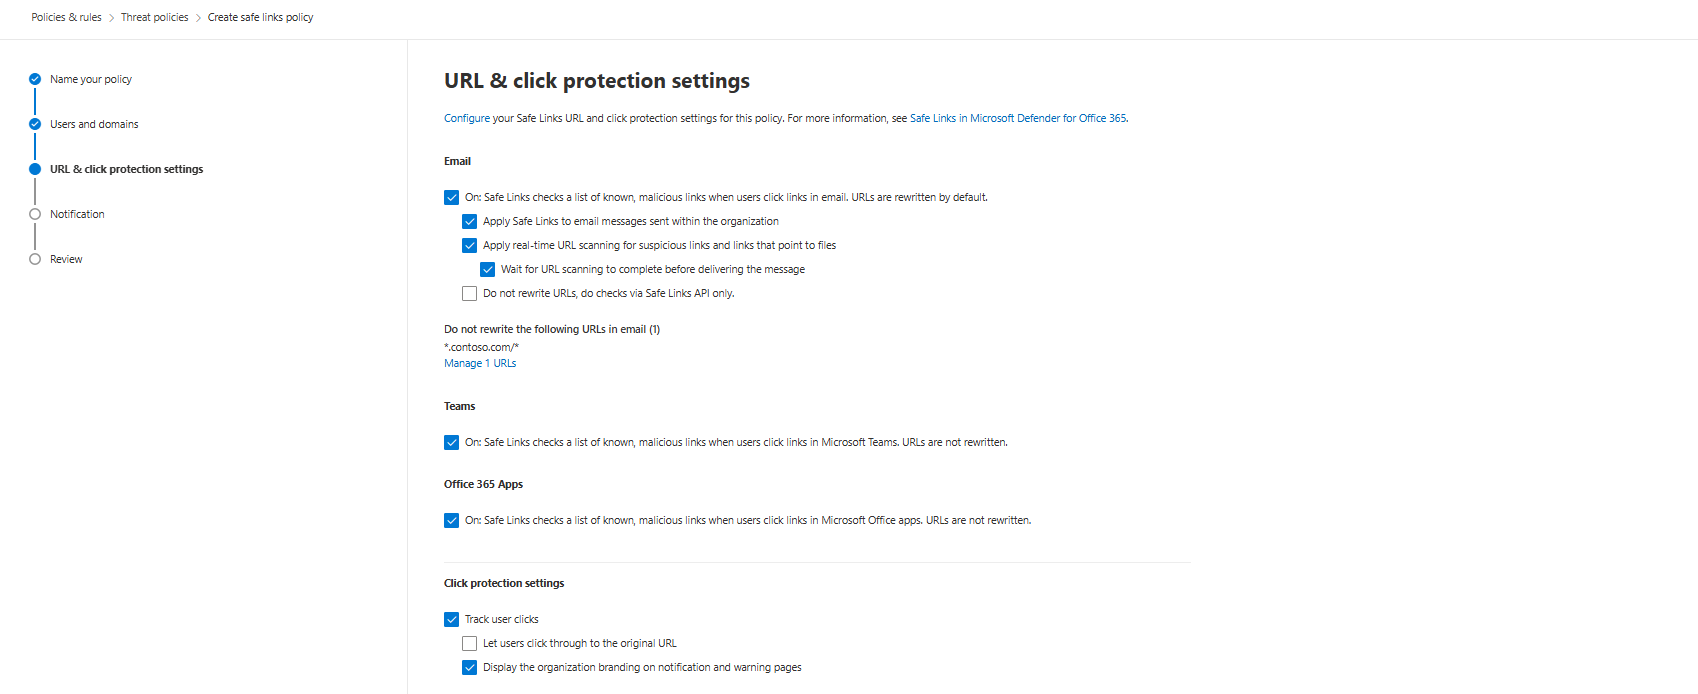
Safe Links: URLs Get Scanned, Just Turn Everything On
Safe Links scans URLs in email, Teams, and Office documents. It wraps URLs, checks them at click time, and detonates suspicious files in the background. Just enable it and move on.
Email Protection
Turn on Safe Links for email. URLs get rewritten to https://safelinks.protection.outlook.com before they land in your mailbox. When users click, the link gets scanned again. This catches URL reputation changes that happened between delivery and click.
Enable these checkboxes:
- On: Safe Links checks a list of known, malicious links (CHECK)
- Apply Safe Links to email messages sent within the organisation (CHECK)
- Apply real-time URL scanning for suspicious links and links that point to files (CHECK)
- Wait for URL scanning to complete before delivering the message (CHECK)
- Do not rewrite URLs, do checks via SafeLinks API only (UNCHECK - you want URL wrapping)
The last one is a trap. If you disable rewriting and just use API checks, users in alternative email clients that don't support the API get zero protection. Wrapping forces protection everywhere.
Teams Protection
Enable Safe Links for Teams. URLs aren't rewritten (Teams doesn't wrap). They're checked at click time against the malicious list. Same protection, different mechanism.
Checkbox: On: Safe Links checks a list of known, malicious links when users click links in Microsoft Teams (CHECK)
Office Apps Protection
Enable Safe Links in Office apps. When users click links in documents, they get scanned. Applies to documents opened from email or stored on OneDrive/SharePoint.
Checkbox: On: Safe Links checks a list of known, malicious links when users click links in Microsoft Office apps (CHECK)
Click Protection Settings
Track user clicks (CHECK). Logs which URLs were clicked so you can see patterns if someone's targeted.
Let users click through to the original URL after warning (UNCHECK). If they see a warning, the URL is malicious. There's no "click through anyway, I trust it" scenario that's legitimate.
Display organization branding on notification pages (CHECK). Users see your logo on warning pages instead of generic Microsoft warnings. Makes warnings look legit so people don't ignore them.
Do Not Rewrite This URL List
Add your internal URLs that Safe Links will waste time checking: your on-prem SharePoint, internal Skype, internal wikis. Syntax:
contoso.com/*covers domain and all paths*.contoso.com/*covers domain, subdomains, and all paths
Don't add wildcards unless you need them. Be specific.
What ZAP Actually Does (And Why It Matters for Investigations)
Zero-hour Auto Purge runs after email delivery. Microsoft re-scans emails against updated threat intelligence. If an email that passed initial checks now looks malicious, ZAP removes it from the user inboxes retroactively.
This is enabled by default. It actually works.
When ZAP fires, the action shows in the EmailPostDeliveryEvents table in Sentinel. You can query it and find which emails were removed, when, and why.
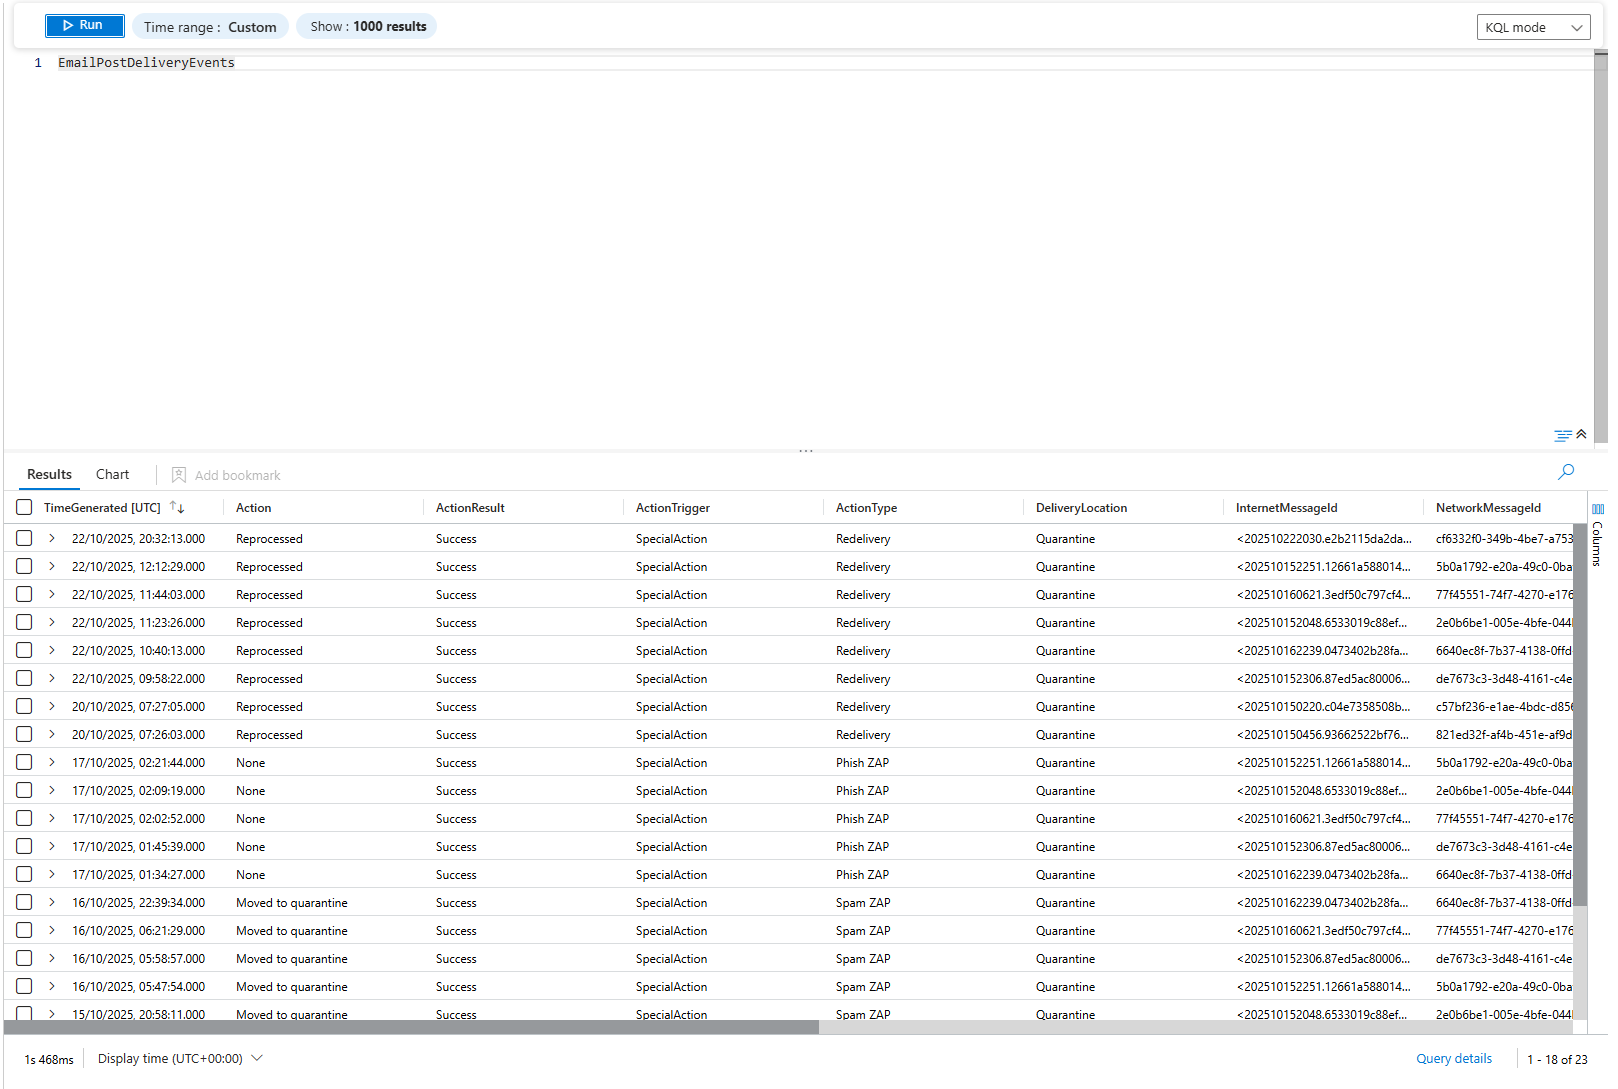
This is where most orgs miss a critical investigation signal. ZAP removes a phishing email. Alert fires. Org sees "Email messages removed after delivery" and thinks "good, system is working, move on."
But the question is: Did anyone click the malicious link before ZAP removed it? Query UrlClickEvents. If the user clicked that link before removal, that user went to the phishing site. Compromised. That's the investigation you should be running (this is the main reason why you also want to have Alert Policies from Defender for Office set up correctly)
Priority Account Protection: Actually Worth Configuring
This adds extra scrutiny to your CEO, CFO, and anyone with critical access.
Who qualifies: Exec team, finance approvers, HR with PII access, and anyone targeted in previous campaigns. Keep it short.
What it adds: Stricter detection of emails claiming to be from those users (lower threshold for flagging suspicious sender behaviour). Visual indicators in Outlook (red banner on emails from external senders). Priority incident tagging in Sentinel.
Don't add everyone who reports to the CEO. Add the CEO. That's it. The feature works by flagging emails that claim to be from protected users, not by protecting those users' accounts. It protects your organisation from fake emails claiming to be from your execs.
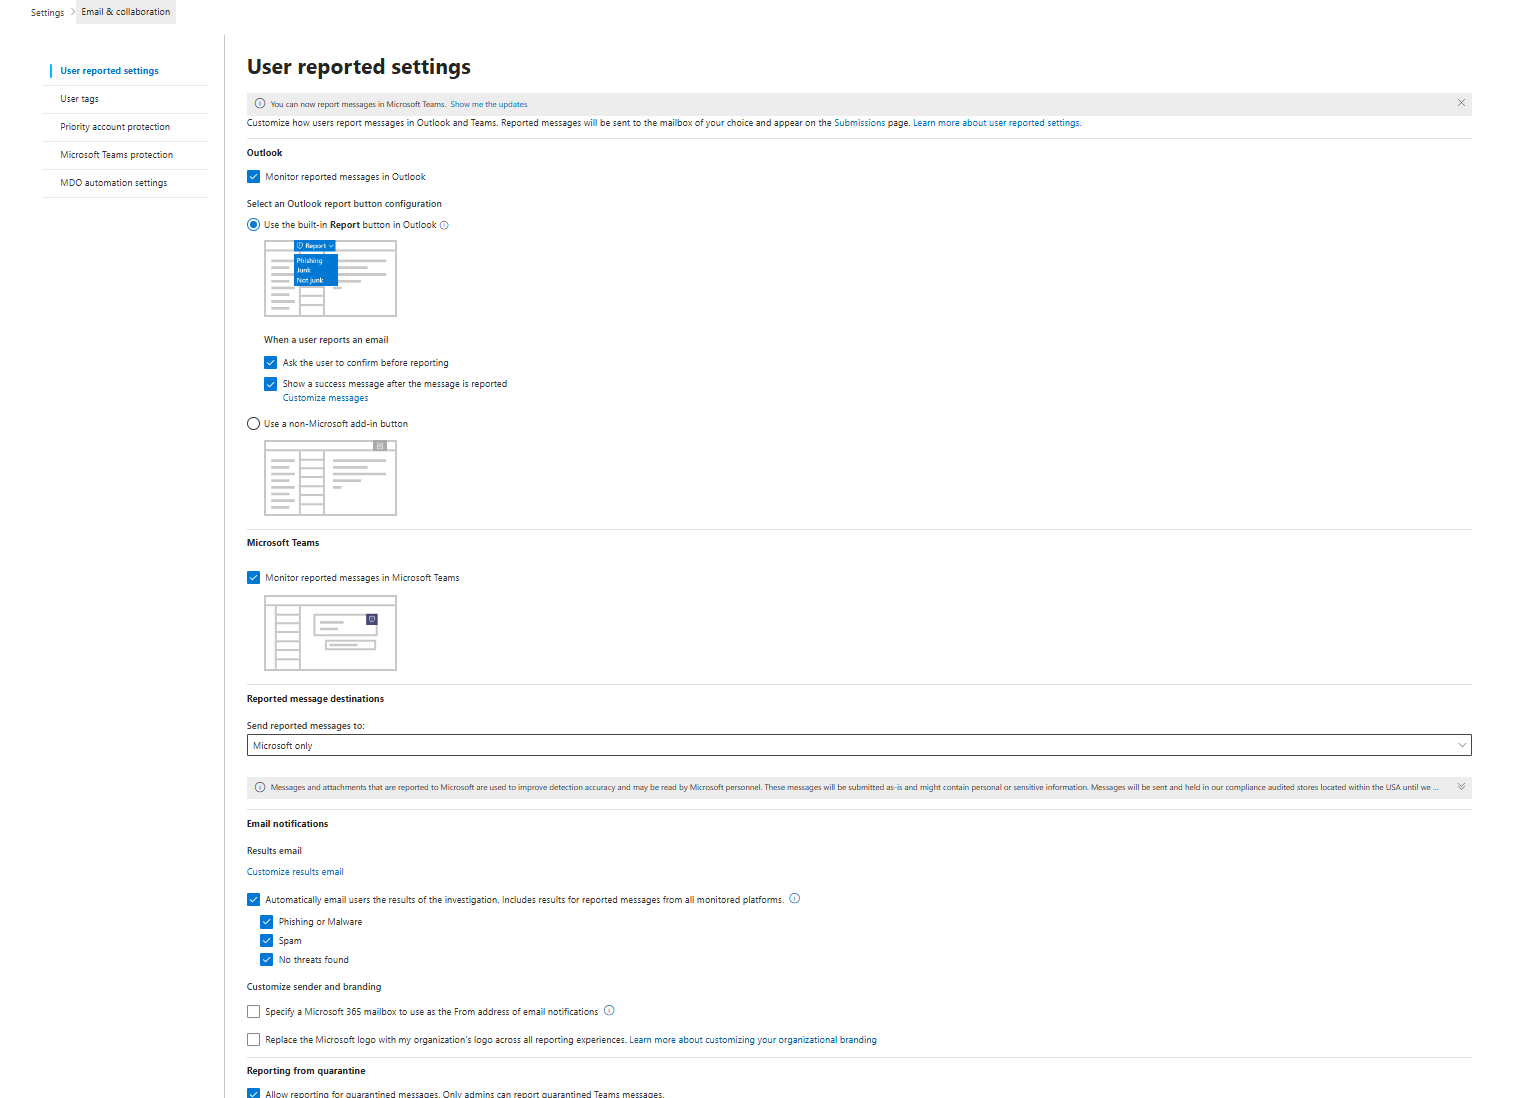
User-Reported Settings: Closing the Loop
Enable the "Report as Phishing" button in Outlook for all users. They click it. Report goes to Microsoft (trains their ML) and as a Microsoft Sentinel incident, if set up correctly. You can also use a custom mailbox; if that's what you prefer, you may use 3rd party tools like KnowBe4, and it may make more sense for you to send those reported emails to another location.
The Monthly Review You Actually Need
After week one, check Sentinel for EmailPostDeliveryEvents. Find blocked/quarantined emails. Sample 10 of them. Are they actually threats? Or false positives?
If the false positive rate is above 2%, adjust thresholds.
After month one, review impersonation protection. Check if mailbox intelligence is flagging things correctly. Query Sentinel for alerts that mention impersonation. Review the blocked emails. Adjust the user list if needed.
Quarterly, review allow/block lists. Are there entries nobody remembers adding? Remove them. Review the Safe Links allow list, especially, as it's a common attack vector for bypass.
That's it. One hour week one, one hour month one, 30 minutes quarterly.
Most orgs don't do this. They set policies, disable them when complaints come in, and waste licensing, but you are now better than this.
Class dismissed.