Unlocking Sentinel's True Power: A Guide to the Graph API and Logic Apps
Alright, class.
You've built playbooks. You've used the built-in connectors to update incidents, post to Teams, and maybe even block an IP. You're feeling pretty good about your automation skills. But eventually, you'll hit a wall. You'll want to do something for there isn't a pre-built connector for.
You'll want to ask a question like, "Get me a list of all the members of this specific Entra ID group," or "Tell me the risk state of this user right now."
To do that, you need to go a level deeper. You need to stop using the pre-built phone lines and learn how to talk directly to the central switchboard of the entire Microsoft 365 universe. That switchboard is called the Microsoft Graph API.
Today's lesson is a big one. We're going to learn how to give our Logic Apps a voice so they can talk to the Graph API securely. This is the prerequisite for some truly god-tier automation, like the auto-updating Sentinel Watchlist we'll build in a future post.
What is an API, Anyway?
Let's demystify this. An API (Application Programming Interface) is just a menu at a restaurant. You, the customer (your Logic App), can't just walk into the kitchen (the Microsoft cloud) and start making your own food. That would be chaos. Instead, you use the menu (the API) to make a specific, structured request to the waiter ("I'd like to GET the list of all users"). The waiter then goes to the kitchen and brings you back exactly what you asked for.
The Microsoft Graph API is the biggest, most powerful menu in the world for Microsoft 365 data.
Step 1: Creating an Identity for Our Robot (App Registration)
Our Logic App needs an ID card to show the bouncer at the API door. In the Azure world, this ID card is called an App Registration. We're essentially creating a non-human identity for our automation to use.
- Navigate to the Microsoft Entra ID portal.
- On the left menu, go to Manage > App registrations.
- Click the + New registration button.
- Name: Give it a clear, descriptive name. This is crucial for not creating a mess later. Something like
Sentinel-Watchlist-Automation-App. - Supported account types: Leave this as the default (
Accounts in this organizational directory only). - Redirect URI: You can leave this blank for our purpose.
- Click Register.

Boom. Your robot now has a name and an ID card (the Application (client) ID and Directory (tenant) ID on the overview page are important; you'll need them later). But right now, that ID card has zero permissions. It can't even open the door to the lobby.
Step 2: Giving Our Robot the Keys (API Permissions)
This is the most critical step. We need to grant our new App Registration very specific permissions from the Graph API "menu."
- In your new App Registration, go to the API permissions blade on the left.
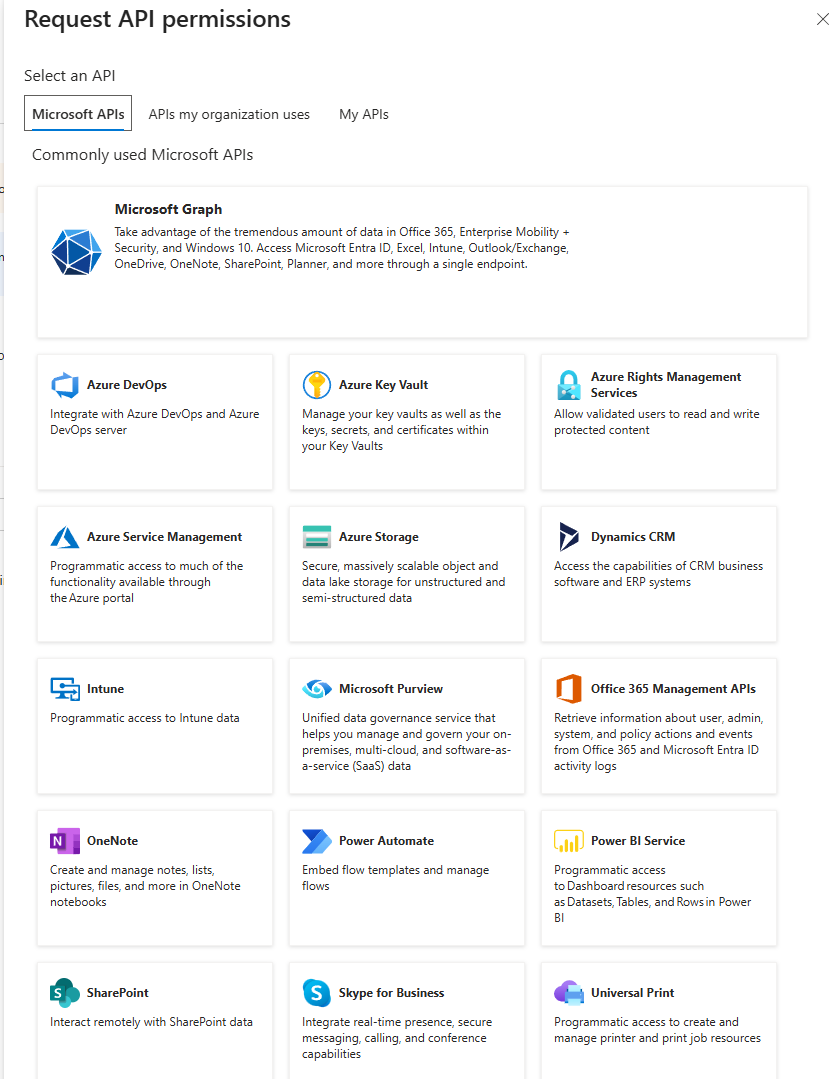
- Click + Add a permission.
- A new pane will open. Select Microsoft Graph.
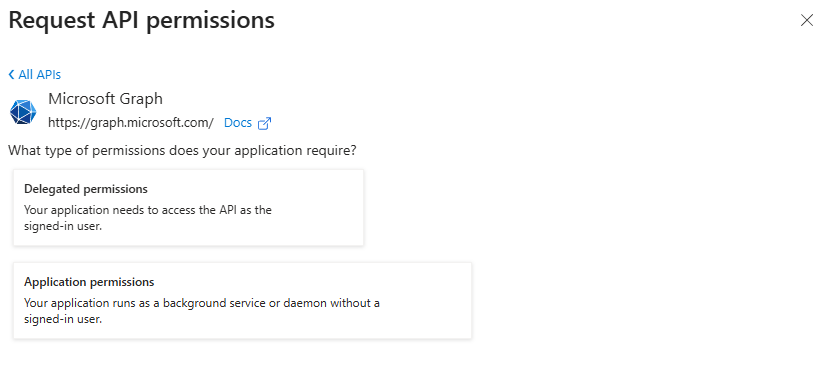
Now you'll be asked a crucial question: Delegated permissions or Application permissions?
- Delegated: The app acts on behalf of a signed-in user. The app can only do what the user can do.
- Application: The app acts as itself, using its own identity. This is for background services and automation where no user is present.
Professor's Note: For our Logic App, we need Application permissions. Our robot needs to be able to work 24/7 without a human sitting there to sign in.
Select Application permissions. A massive list of available "menu items" will appear. For our future goal of updating a watchlist from an Entra ID group, we need to be able to read directory information. Use the search box to find and select the following permissions:
Directory.Read.AllUser.Read.AllGroupMember.Read.All
Click Add permissions.
You're not done yet! You've requested the permissions, but you haven't granted them. You'll see a yellow warning sign that says "Not granted for..."

Click the big Grant admin consent for [Your Tenant] button at the top of the permissions list. A pop-up will ask if you're sure. Click Yes.
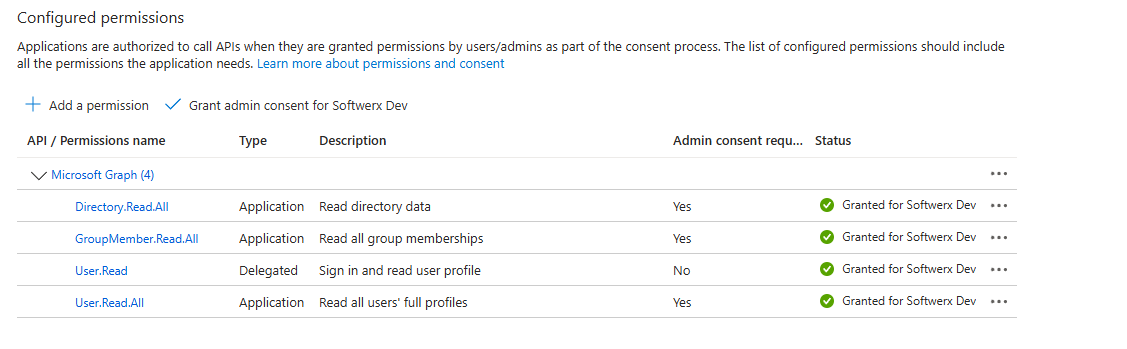
The yellow warnings will turn into green checkmarks. Your robot now has the keys to read user and group information from your directory.
Step 3: The Secret Handshake (Creating a Client Secret)
Our Logic App needs a way to prove it's the real Sentinel-Watchlist-Automation-App and not an imposter. It does this with a password, which in this world is called a Client Secret.
- In your App Registration, go to the Certificates & secrets blade.
- Click on the Client secrets tab and then + New client secret.
- Description: Give it a clear description, like
LogicAppWatchlistSecret. - Expires: Choose a reasonable expiration date. Do not choose "Never." Good security hygiene means rotating your secrets. 12 or 24 months is a good start.
- Click Add.
!!! THIS IS THE MOST IMPORTANT PART OF THIS ENTIRE GUIDE !!!
The next screen will show you the secret Value. This is the ONLY TIME you will ever see this secret. If you navigate away from this page, it's gone forever, and you'll have to create a new one.
COPY THE SECRET VALUE IMMEDIATELY AND PASTE IT SOMEWHERE SAFE (LIKE NOTEPAD FOR THE NEXT STEP). Do not copy the Secret ID. You need the Value.

Step 4: Storing the Secret Securely (Azure Key Vault)
You do not, under any circumstances, paste this secret directly into your Logic App. That's the digital equivalent of taping your house key to your front door. We will store it securely in Azure Key Vault.
- Search for Key Vaults in the Azure Portal and click Create.
- Create a new Key Vault in a suitable resource group. Give it a name, choose a region, and stick with the standard pricing tier.
- Once it's created, go to your new Key Vault.
- On the left menu, click on Secrets.
- Click + Generate/Import.
- Name: Give the secret a name, like
Sentinel-Watchlist-Automation-Secret. - Secret value: Paste the client secret Value that you copied in the previous step.
- It's always a good idea to set up an expiration date; this way, you can monitor expired keys easily.
- Leave the other settings as default and click Create.
- Name: Give the secret a name, like
Your secret is now safely stored in a digital vault.

Step 5: Connecting the Logic App to the Vault
Now, we need to give our Logic App permission to read the secret from the vault.
- Create a new, blank Logic App (Consumption).
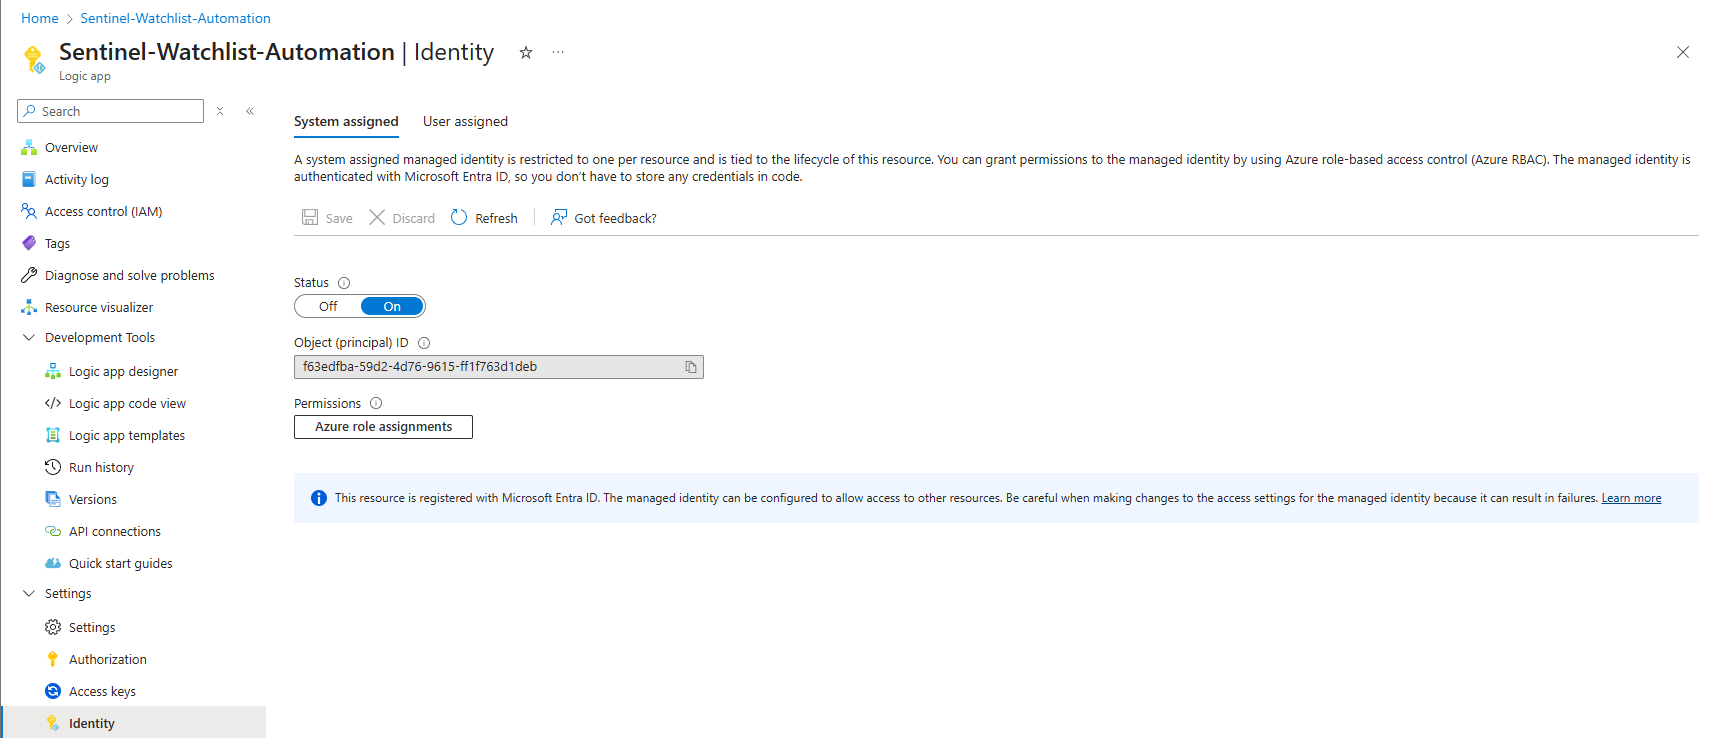
- In your new Logic App, go to the Identity blade on the left.
- Under the System assigned tab, toggle the Status to On and click Save. This gives your Logic App its own, unique identity in Entra ID.
- Now, open Azure role assignments (from the Identity blade in Logic App)
- Select your Subscription (the one that holds the key vault) and click on + Add role assignment
- Select the Scope > Key Vault
- Select the Subscription that holds the key vault
- Select resource (your key vault name)
- Lastly, add your role Key Vault Secrets User
Click on Save
You have now given your Logic App's identity the key to the vault. You are the Key Vault Secrets User.
Step 6: Putting It All Together (The HTTP Request)
We are finally ready to make the call. In your Logic App designer:
- Add a trigger (e.g., a "Recurrence" trigger to run daily).
- Add a new action and search for Azure Key Vault. Select the action Get secret. Sign in (using the Managed Identity option) and point it to your Key Vault and the secret name you created.
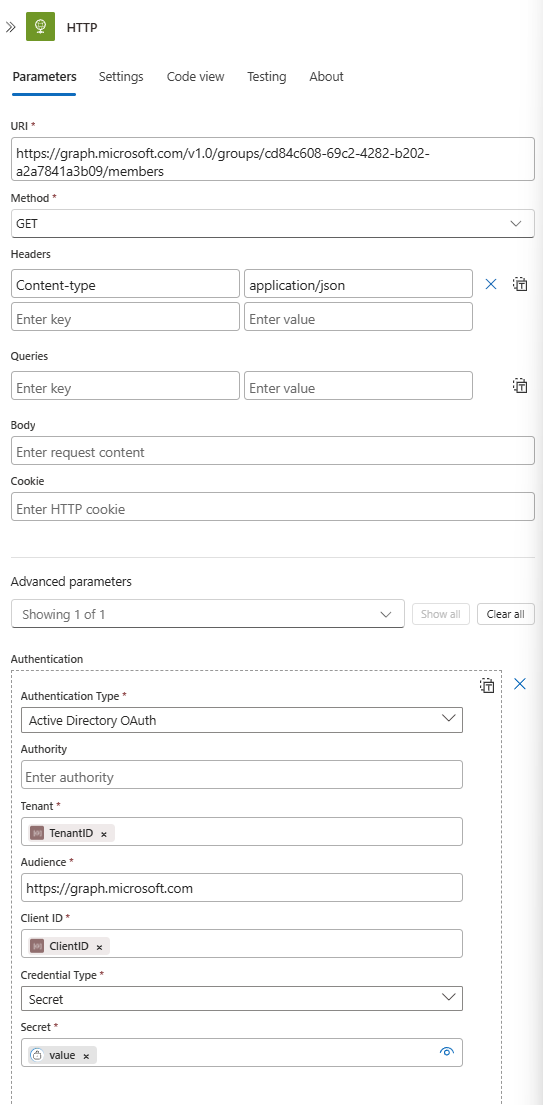
- Add the final action: search for HTTP.
- Method:
GET - URI:
https://graph.microsoft.com/v1.0/groups/{your-group-id}/members(You can get the Group ID from the Entra ID portal). - Headers: Add a header with Key
Content-typeand Valueapplication/json. - Click Advanced parameters and check Authentication.
- Authentication type:
Active Directory OAuth - Tenant: Your Tenant ID.
- Audience:
https://graph.microsoft.com/ - Client ID: The Application (client) ID from your App Registration.
- Credential Type:
Secret - Secret: This is the magic. Use the dynamic content picker and select the
valuefrom your "Get secret" Key Vault action.
- Method:
Save and run your Logic App. If you've done everything correctly, the HTTP action will succeed, and its output will contain the list of all the members of your target group, pulled securely from the Graph API.
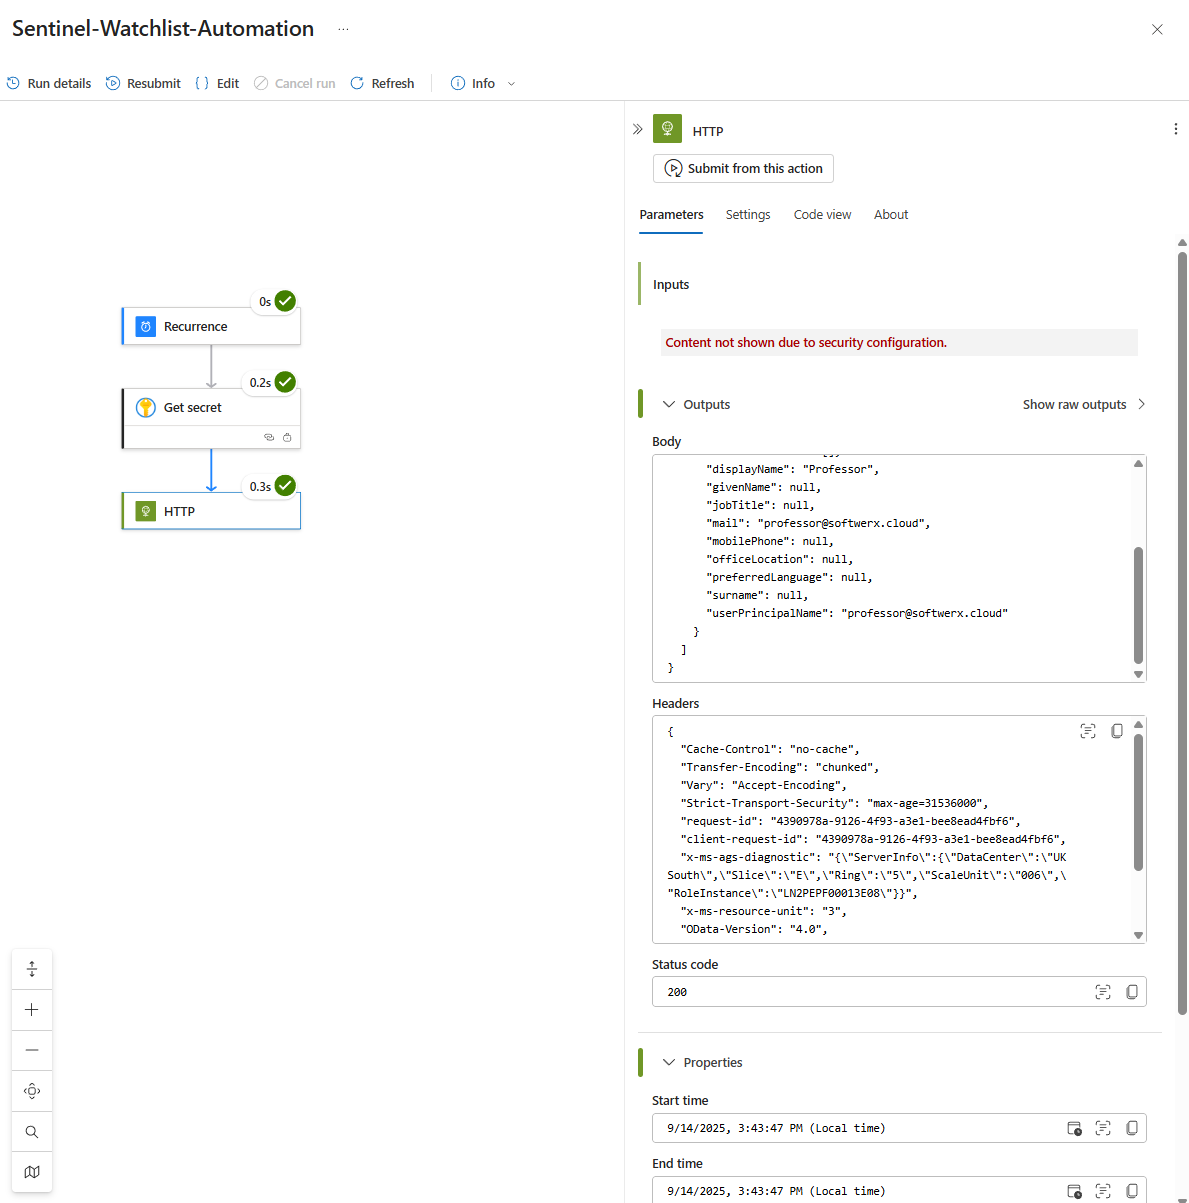
You've just built the secure, foundational bridge between your automation and the entire Microsoft ecosystem. The possibilities are now endless.
Class dismissed.