Microsoft Threat Intelligence: Giving Your Sentinel a Brain
Alright, class.
Let's talk about the first question every SOC analyst asks when a new alert fires. You see an incident for a strange sign-in from a random IP address in a country you don't do business with. The logs tell you where it came from. But the real question, the one that determines if this is a five-minute false positive or a five-hour nightmare, is simple:
"Is this IP address... bad?"
Answering that question is the entire point of Threat Intelligence (TI). Think of Sentinel as a video game. The logs are the game world, and the alerts are the enemies that pop up. Threat Intelligence is the official strategy guide. It's the bestiary that tells you this isn't just any slime; this is a corrosive slime that's resistant to fire damage and is the main quest boss's personal pet.
In simple terms, TI is the context. It’s the difference between seeing a random car drive down your street and knowing that the car is on a police wanted list. Today, we're going to teach Sentinel how to check that wanted list.
Your Two Main Weapons: Microsoft's Brain and Your Brain
In Sentinel, you have two primary ways to wield the power of TI:
- Microsoft Defender Threat Intelligence (MDTI): This is Microsoft's global, all-seeing eye. It's a massive, constantly updated feed of malicious IP addresses, domains, file hashes, and other indicators, collected from trillions of daily signals across their entire ecosystem. We're going to plug this directly into Sentinel.
- Custom Indicators: This is your intelligence. It's the list of malicious IPs you got from an industry report, previous incident or your own team investigation. We're going to teach Sentinel how to remember these, too.
Let's start by connecting to the hive mind.
Part 1: Plugging Into the Matrix (Enabling the MDTI Connector)
First things first, we need to tell Sentinel to start listening to Microsoft's global threat brain. This is, thankfully, one of the easiest and highest-value things you can do.
- Head to the Content Hub: In your Sentinel workspace, navigate to Content management > Content hub. This is the App Store for all things Sentinel (as you hopefully know well by now)
- Find the Treasure: In the search bar, type in "Threat Intelligence (NEW)" You'll see the solution pop up. Click on it.
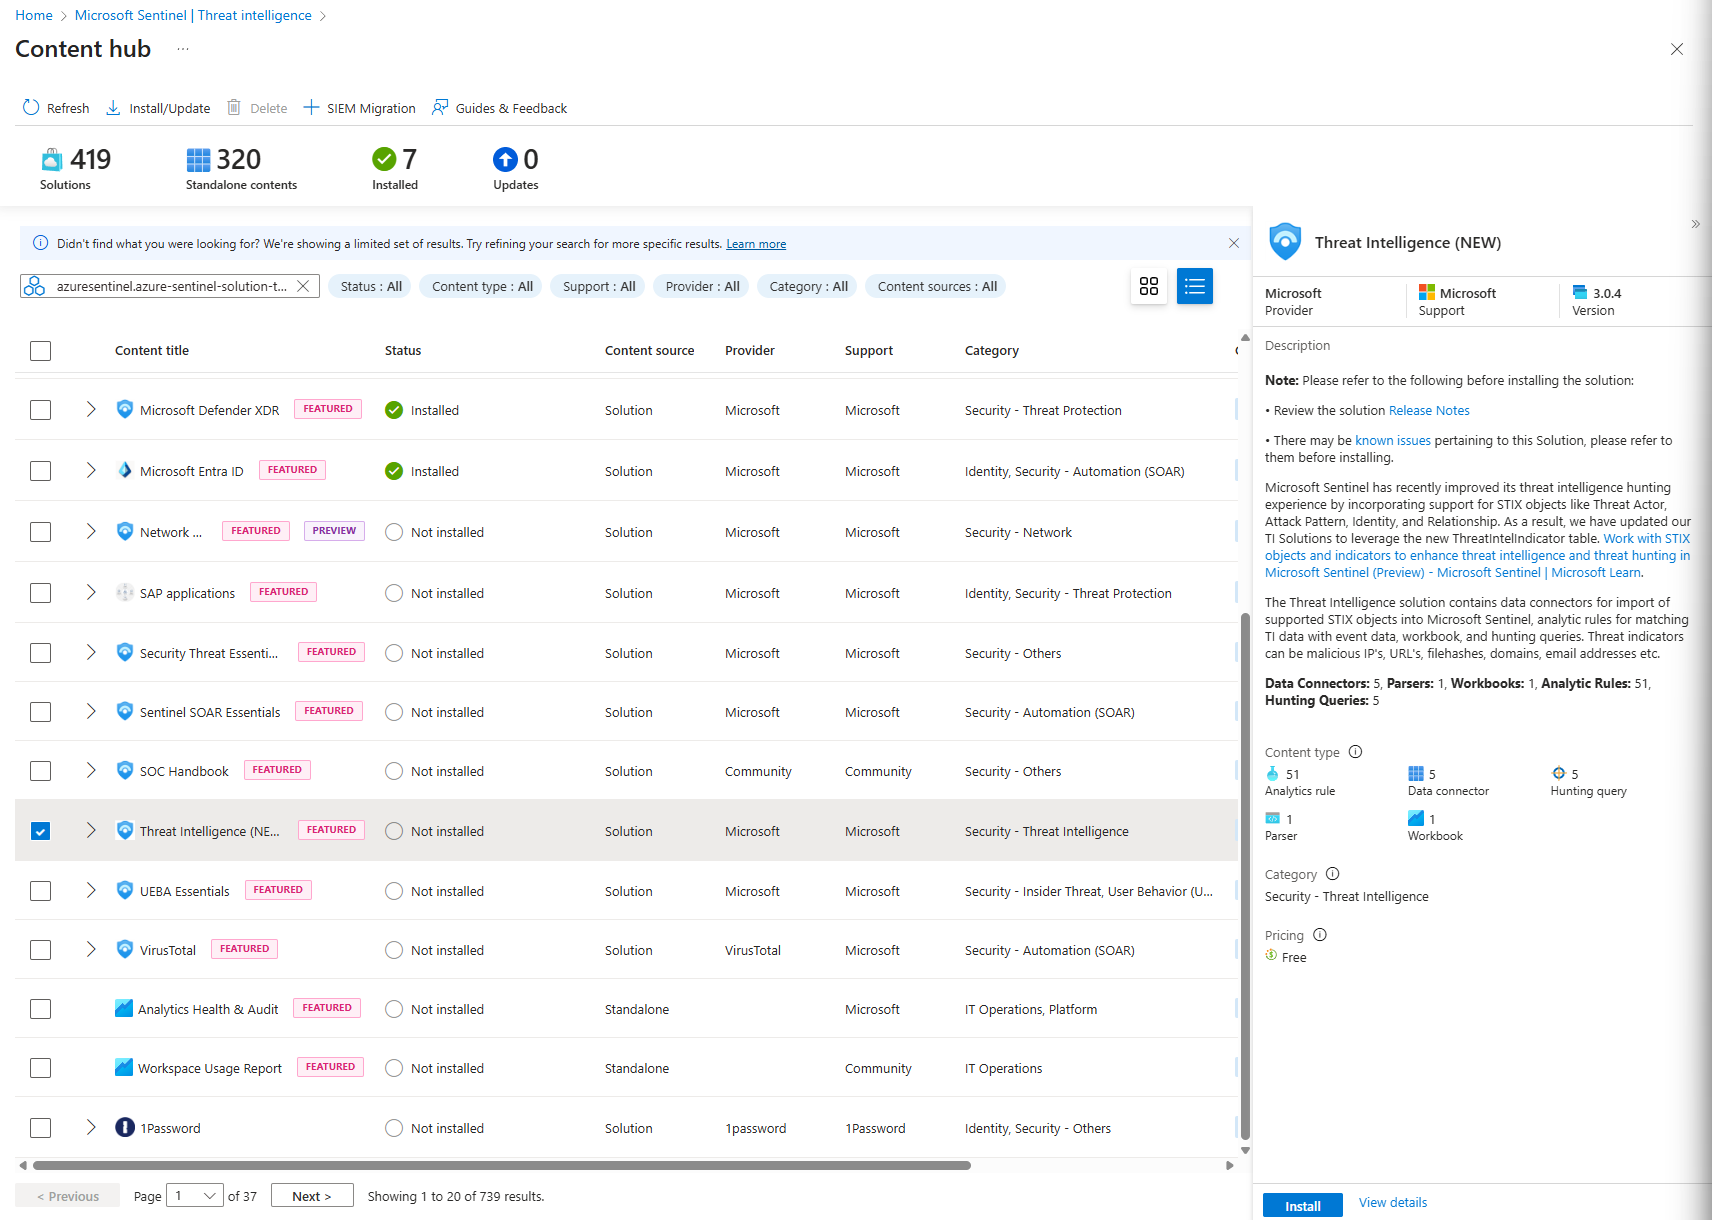
- Install It: Click the Install button. Sentinel will now deploy the necessary components, which include the data connector, some analytics rules, and workbooks.
- Flip the Switch: Now, go to Configuration > Data connectors. You'll see a brand new connector in your list called Microsoft Defender Threat Intelligence. Click on it and then click the Open connector page button.
- Connect: On the connector page, you'll see a simple "Connect" button. Click it. To lower the noise, we can select to bring in indicators that are
at most one month old
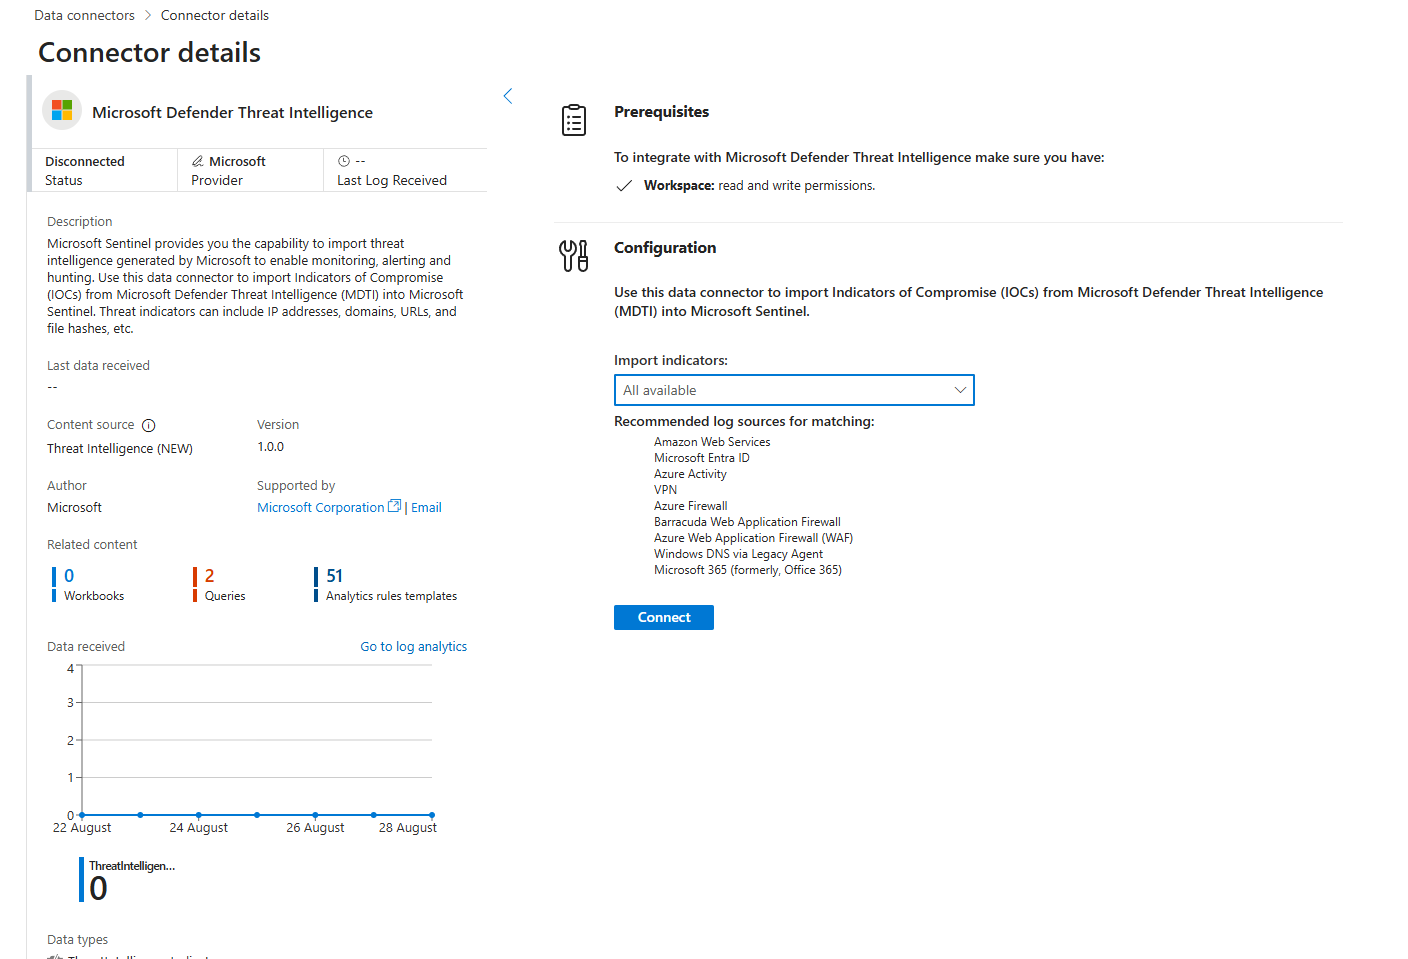
That's it. You're done.
You've just connected your Sentinel instance to one of the largest security intelligence networks on the planet. But what did that actually do?
The Great TI Migration: Announcement
Alright, class, before we go any further, we need to talk about a huge change. If you've used Sentinel before, you might remember a table called ThreatIntelligenceIndicator.
Forget that table. It's legacy. It's the old way. As of July 2025, Microsoft is moving all threat intelligence into two new, much smarter tables:
ThreatIntelIndicators: This is your new main table. It holds the core indicators—the IPs, domains, hashes, etc.ThreatIntelObjects: This is the context table. It holds the rich details about the threats, like who the attacker is, what malware they use, and which campaigns they're a part of.
This new structure is based on the industry-standard STIX format, which is a fancy way of saying intelligence is now richer and more connected. All new analytics rules and queries should use these new tables.
Part 2: The Payoff - How This Actually Helps You
Okay, so we have new tables. So what? This is where the magic happens, in two key ways.
Scenario 1: The Automatic Win (Analytics Rules)
When you install the MDTI solution, it comes with a set of powerful, pre-built analytics rules. The new, updated versions of these rules are now built to query the ThreatIntelIndicators table.
- Example Rule:
TI map IP entity to SigninLogs - What it does (in plain English): "Hey Sentinel, constantly watch all my
SigninLogs. If you ever see a user successfully sign in from an IP address that also exists in our newThreatIntelIndicatorstable, create a medium-severity incident immediately."
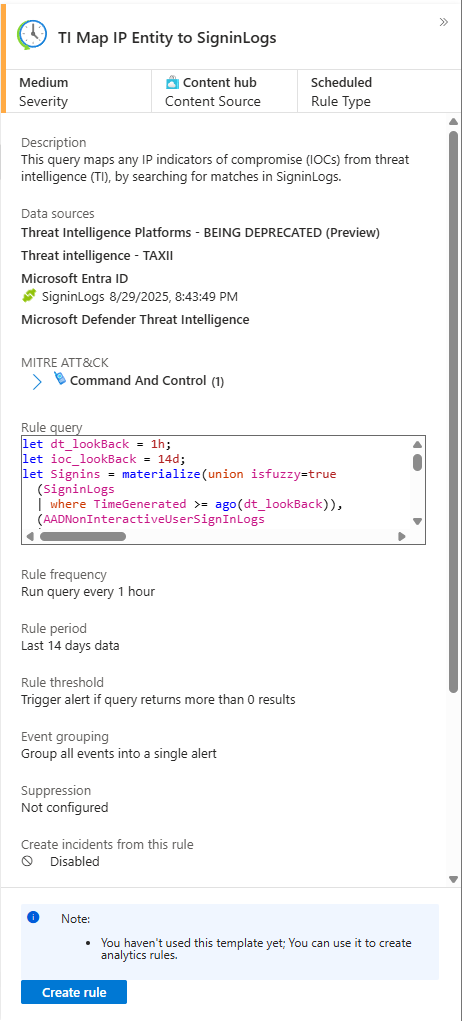
This is a massive win. Just by enabling the connector and using the latest rules from the Content Hub, you've weaponised your TI against the new, correct data source.
Scenario 2: The Proactive Hunt (Enriching Your Queries)
The built-in rules are great, but the real power comes when you start using these new, richer tables in your own threat hunts.
Let's take a real-world scenario. You're monitoring your firewall logs (CommonSecurityLog). How do you find the real needles in that haystack? You join it with your new TI data.
Open up Logs and let's write a hunting query.
// Step 1: Create our "wanted list" of malicious IPs from the new TI table.
let maliciousIPs = ThreatIntelIndicators
    | where TimeGenerated > ago(30d) // Only use recent intelligence
    | where isnotempty(ObservableValue)
    | summarize by ObservableValue;
// Step 2: Hunt through our firewall logs for any matches.
CommonSecurityLog
| where TimeGenerated > ago(1d)
| where isnotempty(SourceIP)
// The magic happens here: we're checking if the firewall's Source IP is on our wanted list.
| where SourceIP in (maliciousIPs)
| project TimeGenerated, SourceIP, DestinationIP, DestinationPort, DeviceAction, Reason
| sort by TimeGenerated desc
Breakdown: We are querying the ThreatIntelIndicators table to get our list of known-bad IPs and using it as a filter against our own firewall logs. This query instantly elevates the most critical events to the top.

Part 3: Forging Your Own Weapons
Microsoft's global brain is powerful, but it doesn't know everything. It doesn't know about the brand-new phishing domain that started targeting your company's executives this morning. It doesn't know about the specific list of malicious IPs you just got in a confidential report from your industry's security sharing group.
This is where you level up. You stop being just a consumer of threat intelligence and become a producer. You're going to teach Sentinel about the threats that are unique to your world.
Navigate to Threat Management > Threat Intelligence. This is your personal armoury. Let's start forging.

Weapon #1: The Threat Object (The Wanted Poster)
A Threat Object is a single piece of the puzzle. It could be an Indicator (like an IP address), a Threat Actor (the bad guy group), or an Attack Pattern (the malware they use).
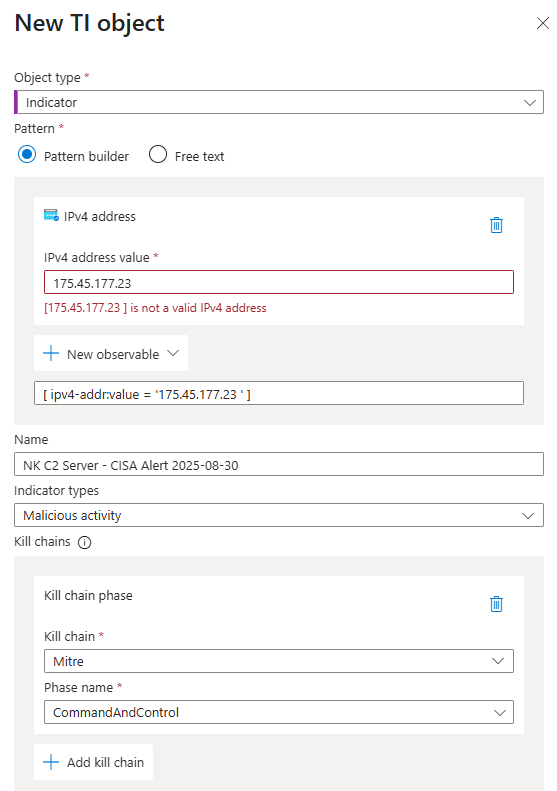
Let's use a real-world scenario. You just received an urgent CISA alert about a new North Korean state-sponsored threat actor using a specific IP address for their command-and-control server. You need to get this into Sentinel right now.
- From the Threat Intelligence blade, click the big + New button. You’ll see two options. For now, we're creating the core piece of evidence, so select New TI object.
- Object type: A dropdown appears. We're adding a C2 address, which is a type of Indicator.

- The Pattern: This is the technical heart of the indicator. You're telling Sentinel what the "badness" looks like in the logs.
- For an IP address, the pattern is simple. Under Pattern type, choose
ipv4-addr. In the Value box, we'll enter the IP from our CISA alert. Let's use175.45.177.23(a known North Korean IP address).
- For an IP address, the pattern is simple. Under Pattern type, choose
Now for the fun part: filling out the rest of the wanted poster.
- Name: Give it a human-readable name. Don't just paste the IP. Something like
NK C2 Server - CISA Alert 2025-08-30. - Indicator types: Tell Sentinel why this thing is bad. You can choose multiple. For a C2 server,
malicious-activityis perfect. - Kill chain (MITRE ATT&CK®): This is how you sound smart in meetings. Click Add, choose the
MITRE ATT&CKframework, and select the phase. A C2 server fits perfectly under Command and Control.
- Valid from / Valid until: This is CRITICAL. Threat intelligence gets stale like old bread. An IP that's a C2 server today might be an innocent cat picture website in six months. Set an expiration date (e.g., 90 days from now) so you don't chase ghosts later.
- Source: Where did you get this info? Be specific! Type
CISA Alert AA25-242A. Now, when someone asks why this IP is being blocked six months from now, you have an answer. - Created & Modified: Again, be specific when TI was created and when any changes to it were made
- Created by reference: This is an advanced field. In the STIX world, everything has a unique ID. If this indicator was created by another object (for example, an "Identity" object representing the CISA organisation), you would put its STIX object ID here. For most manual entries, you can safely leave this blank.
- Description: This is your "notes" section. Don't be lazy here. Copy and paste the relevant summary from the CISA report. Something like:
"This IP address has been identified as a command-and-control server used by North Korean state-sponsored actors in phishing campaigns targeting financial institutions."When you're looking at this six months from now, this description will be pure gold. - Tags: Think of these like hashtags. They help you group and find related indicators later. Good tags for our example would be
CISA,NorthKorea,C2,FinancialSector. - Revoked: Is this intelligence now known to be incorrect or out of date? Check this box. For a brand-new, active threat, you'll leave this unchecked.
- Confidence: How sure are you? For a CISA alert, you're pretty sure. Set it to a high value like
85or90. - Traffic Light Protocol (TLP): This is the universal "who can I share this with?" system.
- RED: Eyes only. Don't share outside this room.
- AMBER: Share with your organisation and trusted partners, but not publicly. (This is a good default for most corporate TI).
- GREEN: Share with the wider community.
- WHITE: Public. Shout it from the rooftops.
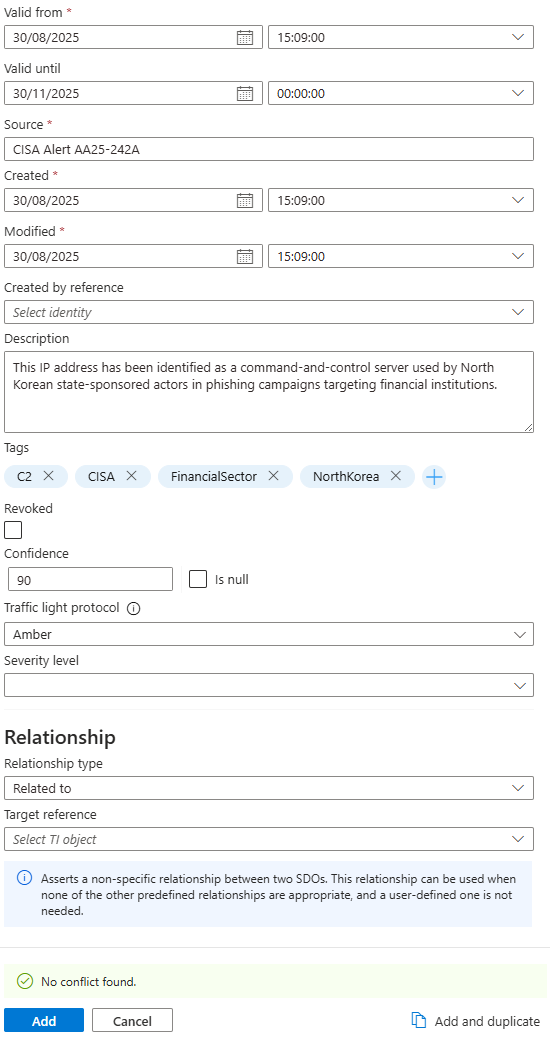
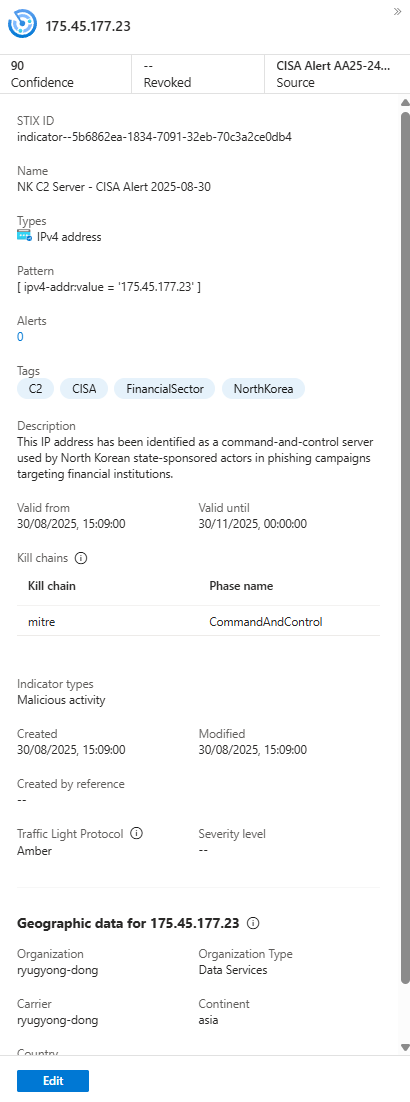
Click Add. You've just created a high-fidelity, context-rich indicator. All your TI analytics rules will now automatically start checking for this IP.
Weapon #2: The TI Relationship (Connecting the Dots)
Okay, you've created a wanted poster for a single IP address. That's a great start. But right now, it's just one clue pinned to a giant, empty corkboard.
The CISA report also mentioned that this IP is used by the threat actor "LAZARUS GROUP" to deploy the "VileRAT" malware.
A flat list of indicators is useful. A connected graph of threat knowledge is a superpower. It's time to start connecting the dots.
To link everything together, we first need to make sure all the puzzle pieces are on the board. We already have our IP indicator. Now, let's create the other two.
Step 1: Create the Threat Actor Object
First, we need to create an object for the bad guys themselves.
- Go to + New > New TI object.
- For Object type, select
Threat Actor. - Give it the name
LAZARUS GROUPand fill in any other details you have from the report. - Click Add. One more piece is on the board.
Step 2: Create the Malware Object
Now, let's create an object for the weapon they're using.
- Do it again: + New > New TI object.
- For Object type, this time select
Attack Pattern - Name it
VileRATand add your details. - Click Add.
Alright. Now all three of our puzzle pieces exist in Sentinel: the IP Indicator, the Threat Actor, and the Malware. It's time to connect them with a string.
Step 3: Build the Relationships
This is where we tell Sentinel how these pieces are related.
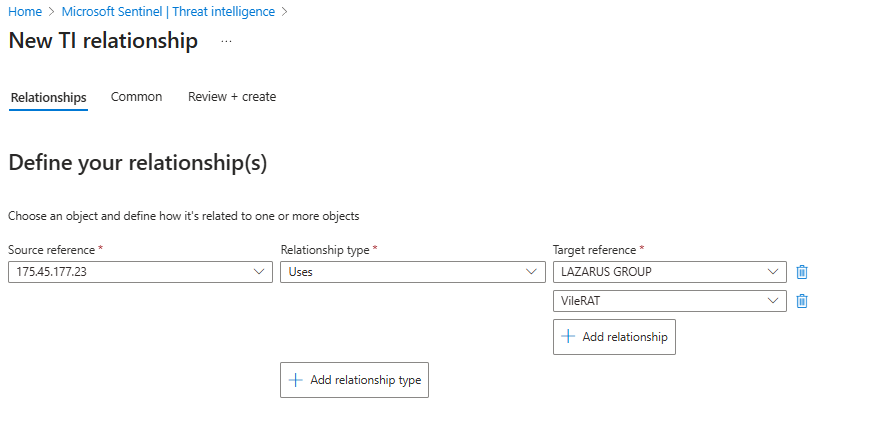
- Go to + New > TI relationship. This opens the relationship builder.
- Relationship A: The Actor Uses the Malware
- For Source reference, click "Select TI object" and find the
175.45.177.23IPv4 address you just created. - For Relationship type, choose
uses. - For Target reference, click "Select TI object" and find the
VileRATMalware object. - Repeat Target reference, this time add
LAZARUS GROUP
- For Source reference, click "Select TI object" and find the
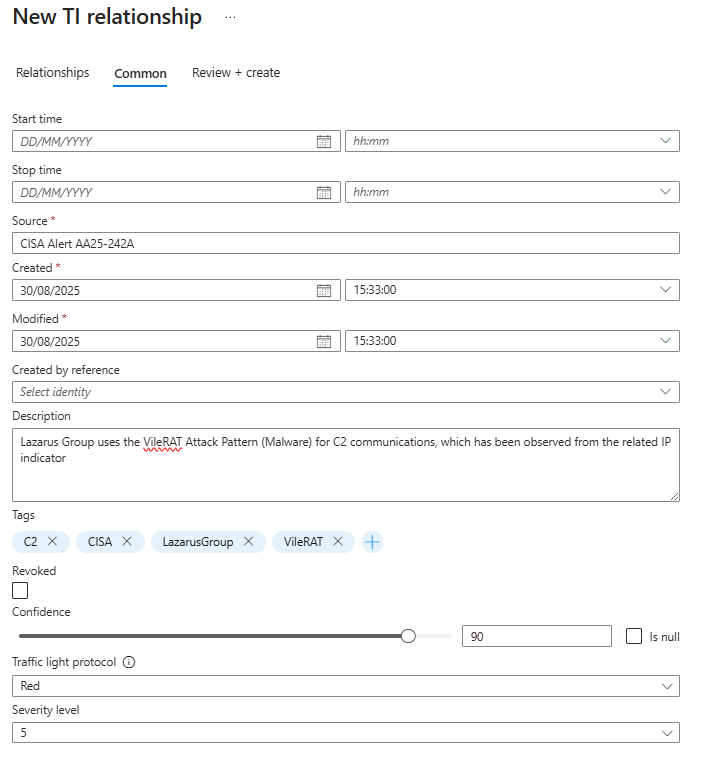
- Finalise the Details and Create: With your relationships defined, click over to the Common tab. This is where you add the crucial context for your future self (and your teammates).
- Source: Where did you get this relationship intelligence from? Be specific. Enter
CISA Alert AA25-242A. - Description: Summarise the story you just built. "Lazarus Group uses the VileRAT Attack Pattern (Malware) for C2 communications, which has been observed from the related IP indicator."
- Confidence: How sure are you about these connections? For a government alert, this is high. Set it to
90. - Tags: Add relevant tags like
CISA,LazarusGroup,VileRAT, andC2. - Leave the other fields like Start time and Stop time, as they are unless the CISA report gives you a specific timeframe for the campaign.
- Traffic Light Protocol: Set to Red (Do not share. Eyes only.)
- Severity Level: On a scale of 0-5, how much should you panic when you see this?
- Source: Where did you get this relationship intelligence from? Be specific. Enter
Red threat actor using a known C2 server is not a "1" or "2". This is a high-severity threat. We're setting this to 5.
You've just done something incredible. You've taught Sentinel the story: "The Lazarus Group uses VileRAT malware, and this specific IP address is an indicator of that malware's activity."
The next time an alert fires for that IP, you won't just see an IP address. The Sentinel investigation graph will show you the entire connected story. You can pivot from the IP to the malware, and from the malware to the threat actor, instantly understanding the who, what, and how of the attack.
You've turned a single data point into a rich, interconnected web of intelligence. This is how you go from being a reactive alert-closer to a proactive threat hunter.
Class dismissed.